This is one area where I would intentionally diverge slightly from a production environment because you only have one physical NIC per Proxmox host.
In production you would normally have:
- 2 × 10/25/40/100GbE for Ceph
- 2 × 10GbE for OpenStack tenant traffic
- 2 × 1/10GbE for management
- Separate storage and external networks
On your homelab, all traffic must traverse the same NIC. Rather than trying to artificially split traffic with VLANs immediately, I recommend creating logical bridges now and moving them onto separate VLANs or NICs later. This lets you keep the same VM configuration while your physical network evolves.
The Virtual Network
Target Architecture
Initially your network will look like this:
                  Internet
                     │
                Home Router
                192.168.1.1
                     │
               Gigabit Switch
                     │
      ┌──────────────┬──────────────┐
      │              │              │
    pve01          pve02          pve03
      │              │              │
    eno1           eno1           eno1
      │              │              │
      └──────────────┴──────────────┘
             Single Physical LAN
Inside each Proxmox node, you’ll create four Linux bridges:
                 eno1
                   │
         ┌─────────┴─────────┐
         │                   │
      Linux Bridge Layer    ...
         │
 ┌───────┼────────┬────────┬────────┐
 │       │        │        │        │
vmbr0  vmbr1   vmbr2    vmbr3      ...
Mgmt   Ceph    Tenant   External
Although they all use the same NIC today, each bridge has a distinct purpose.
Why Use Multiple Bridges?
Suppose six months from now you install a dual-port 10GbE card.
Instead of changing every VM, you only update the bridge configuration:
Before

      VM
       │
     vmbr1
       │
     eno1

After

      VM
       │
     vmbr1
       │
    enp5s0f0
    (10GbE)
The VM configuration never changes.
Network Design
I recommend the following address ranges:
| Bridge | Network | Purpose |
|---|---|---|
| vmbr0 | 192.168.1.0/24 | Proxmox Management |
| vmbr1 | 172.16.10.0/24 | Ceph Storage |
| vmbr2 | 10.100.0.0/24 | OpenStack Tenant |
| vmbr3 | 172.16.100.0/24 | External/Floating IPs |
Initially, only vmbr0 has a physical uplink.
The others are internal-only bridges until OpenStack configures them.
Step 1 – Identify Your NIC
On every node:
ip linkExample:
lo

eno1
or
enp3s0We’ll assume:
eno1Step 2 – Existing Proxmox Configuration
Typically:
auto lo
iface lo inet loopback

auto eno1
iface eno1 inet manual

auto vmbr0
iface vmbr0 inet static
    address 192.168.1.10/24
    gateway 192.168.1.1
    bridge-ports eno1
    bridge-stp off
    bridge-fd 0
This is sufficient for Proxmox itself.
Step 3 – Create vmbr1
This will later carry Ceph traffic.
Since you have one NIC:
bridge_ports noneExample:
auto vmbr1

iface vmbr1 inet static
    address 172.16.10.11/24
    bridge_ports none
    bridge_stp off
    bridge_fd 0
On pve02:
172.16.10.12On pve03:
172.16.10.13Although there is no physical interface attached yet, the bridge exists and VMs can connect to it.
Step 4 – Create vmbr2
Tenant Network
auto vmbr2

iface vmbr2 inet manual
    bridge_ports none
    bridge_stp off
    bridge_fd 0
No IP address is required.
OpenStack Neutron will eventually own this bridge.
Step 5 – Create vmbr3
External Network
auto vmbr3

iface vmbr3 inet manual
    bridge_ports none
    bridge_stp off
    bridge_fd 0
Again, OpenStack will later attach provider networks or floating IPs here.
Resulting /etc/network/interfaces
Example for pve01:
auto lo
iface lo inet loopback

iface eno1 inet manual

auto vmbr0
iface vmbr0 inet static
    address 192.168.1.10/24
    gateway 192.168.1.1
    bridge_ports eno1
    bridge_stp off
    bridge_fd 0

auto vmbr1
iface vmbr1 inet static
    address 172.16.10.11/24
    bridge_ports none
    bridge_stp off
    bridge_fd 0

auto vmbr2
iface vmbr2 inet manual
    bridge_ports none
    bridge_stp off
    bridge_fd 0

auto vmbr3
iface vmbr3 inet manual
    bridge_ports none
    bridge_stp off
    bridge_fd 0
What Each Bridge Will Eventually Carry
vmbr0 – Management
Connect:
- Proxmox GUI
- SSH
- Ansible
- DNS
- NTP
- Grafana
- OpenStack APIs
Traffic:
SSH
HTTPS
API
DNS
NTP
vmbr1 – Ceph Storage
Eventually:
OSD Replication
Recovery
Heartbeat
Client RBD Traffic
Current:
Ceph MON
Ceph MGR
Ceph OSD
Future:
Move this bridge onto a dedicated 10GbE NIC.
vmbr2 – OpenStack Tenant
Neutron creates:
VXLAN
Geneve
Tenant Networks
Routers
DHCP
Your VMs will connect here.
vmbr3 – External
Eventually:
Floating IPs
Load Balancers
Ingress
Public Networks
This becomes the equivalent of AWS public networking.
VM Placement
Proxmox Management VM
vmbr0Ceph Nodes
vmbr0
vmbr1
OpenStack Controller
vmbr0
vmbr1
vmbr2
vmbr3
OpenStack Compute
vmbr0
vmbr1
vmbr2
vmbr3
Kubernetes
Control Plane:
vmbr2Worker Nodes:
vmbr2Slurm
vmbr2Evolution of the Network
Stage 1 (Current)
eno1
 │
vmbr0
vmbr1
vmbr2
vmbr3
All bridges ultimately share the same physical network.
Stage 2 (Managed Switch with VLANs)
eno1

 VLAN 10 → vmbr0
 VLAN 20 → vmbr1
 VLAN 30 → vmbr2
 VLAN 40 → vmbr3
No VM changes required.
Stage 3 (10GbE Upgrade)
 1Gb
 eno1
  ↓
vmbr0

 10Gb
enp5s0
  ↓
vmbr1
  ↓
Ceph

 10Gb
enp5s1
  ↓
vmbr2
  ↓
Tenant
Again, VMs remain unchanged because they connect to the logical bridge, not the physical interface.
A Practical Recommendation
One enhancement I’d make to your plan is to introduce VLAN awareness from the beginning. Even if your current switch is unmanaged, configure the Proxmox bridges with bridge-vlan-aware yes and leave VLAN filtering unused initially. When you later replace your switch with a managed model, you can simply assign VLAN IDs to the existing bridges without redesigning the virtual network. This keeps your lab much closer to the architecture you’ll encounter in enterprise OpenStack environments.
root@pve0:~# ip a
1: lo: <LOOPBACK,UP,LOWER_UP> mtu 65536 qdisc noqueue state UNKNOWN group default qlen 1000
    link/loopback 00:00:00:00:00:00 brd 00:00:00:00:00:00
    inet 127.0.0.1/8 scope host lo
       valid_lft forever preferred_lft forever
    inet6 ::1/128 scope host noprefixroute
       valid_lft forever preferred_lft forever
2: nic0: <BROADCAST,MULTICAST,UP,LOWER_UP> mtu 1500 qdisc mq master vmbr0 state UP group default qlen 1000
    link/ether 18:03:73:45:71:4e brd ff:ff:ff:ff:ff:ff
    altname enx18037345714e
3: vmbr0: <BROADCAST,MULTICAST,UP,LOWER_UP> mtu 1500 qdisc noqueue state UP group default qlen 1000
    link/ether 18:03:73:45:71:4e brd ff:ff:ff:ff:ff:ff
    inet 192.168.1.10/24 scope global vmbr0
       valid_lft forever preferred_lft forever
    inet6 fe80::1a03:73ff:fe45:714e/64 scope link proto kernel_ll
       valid_lft forever preferred_lft forever
4: tap101i0: <BROADCAST,MULTICAST,PROMISC,UP,LOWER_UP> mtu 1500 qdisc fq_codel master vmbr0 state UNKNOWN group default qlen 1000
    link/ether 16:00:5d:ed:28:92 brd ff:ff:ff:ff:ff:ff
This confirms a few things:
- Your physical NIC is
nic0(noteno1). nic0is already enslaved tovmbr0.- Your Proxmox management network is working on 192.168.1.10/24.
- VM 101 is connected to
vmbr0(tap101i0).
So your current layout is:
                    Internet
                        │
                 Home Router
                  192.168.1.1
                        │
                     Switch
                        │
                     nic0
                        │
                     vmbr0
                        │
        ┌───────────────┴───────────────┐
        │                               │
   Proxmox Host                       VM 101
That is exactly how a default Proxmox installation looks.
The next step
You do not want to touch vmbr0 because it carries your management connection.
Instead, simply add three more Linux bridges.
Your finished layout will become:
                         nic0
                           │
                        vmbr0
                    (Management)
                           │
     ┌─────────────────────┼─────────────────────┐
     │                     │                     │
  tap101                Proxmox GUI             SSH

vmbr1 (Ceph)
(no physical port)

vmbr2 (OpenStack Tenant)
(no physical port)

vmbr3 (External)
(no physical port)
Notice that only vmbr0 is connected to the physical NIC.
The other bridges are internal virtual switches for now.
Edit /etc/network/interfaces
First, show me its current contents:
cat /etc/network/interfacesIt is likely something like:
auto lo
iface lo inet loopback

iface nic0 inet manual

auto vmbr0
iface vmbr0 inet static
    address 192.168.1.10/24
    gateway 192.168.1.1
    bridge-ports nic0
    bridge-stp off
    bridge-fd 0
Leave all of that exactly as it is.
Below it, add:
auto vmbr1
iface vmbr1 inet static
    address 172.16.10.11/24
    bridge-ports none
    bridge-stp off
    bridge-fd 0
    bridge-vlan-aware yes

auto vmbr2
iface vmbr2 inet manual
    bridge-ports none
    bridge-stp off
    bridge-fd 0
    bridge-vlan-aware yes

auto vmbr3
iface vmbr3 inet manual
    bridge-ports none
    bridge-stp off
    bridge-fd 0
    bridge-vlan-aware yes
Notice:
vmbr0→ connected tonic0vmbr1→ internal bridge with an IP for Cephvmbr2→ internal bridge for OpenStack tenant networksvmbr3→ internal bridge for OpenStack provider/external networks
Why give vmbr1 an IP?
Ceph daemons communicate over an IP network.
Eventually you’ll configure:
pve0   172.16.10.11
pve1   172.16.10.12
pve2   172.16.10.13
Later, if you install a second NIC:
nic1
  │
vmbr1
Ceph immediately starts using the faster network without changing any VM configuration.
Why no IP on vmbr2?
Because OpenStack Neutron owns this network.
Eventually you’ll have tenant networks like:
10.100.0.0/24
10.101.0.0/24
10.102.0.0/24
OpenStack creates those dynamically.
Why no IP on vmbr3?
Eventually it becomes your provider network.
Think of it as the equivalent of:
- AWS Public Network
- Azure Public IPs
- Floating IPs
Neutron controls it.
Apply the configuration
Run:
ifreload -aor
systemctl restart networkingUsing ifreload -a is safer over SSH because it applies changes with less risk of disconnecting you.
Verify
Run:
ip aYou should now see:
nic0
vmbr0
vmbr1
vmbr2
vmbr3
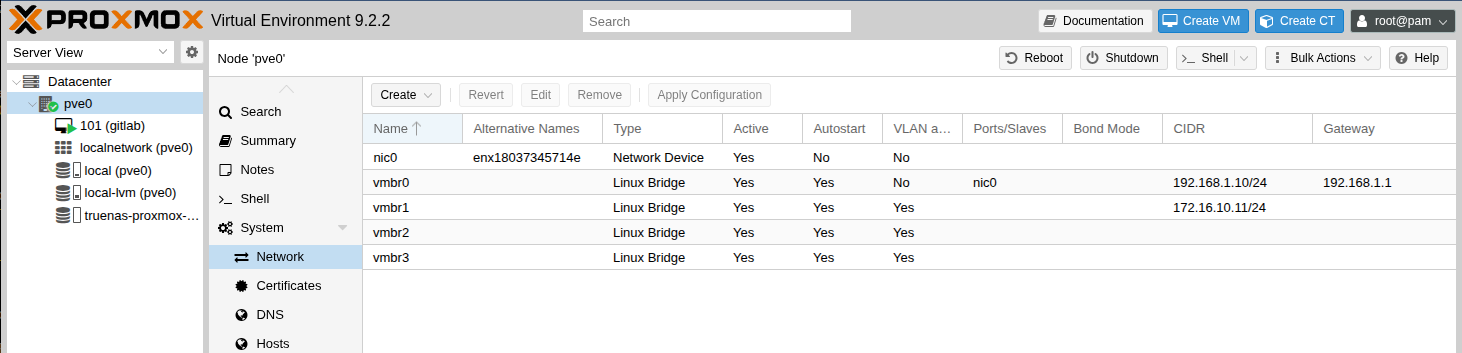
tap101i0Verify bridges
bridge linkor
brctl showExpected:
bridge name     interfaces
vmbr0           nic0
                tap101i0
vmbr1
vmbr2
vmbr3
The empty bridges are exactly what we want at this stage.
One recommendation before proceeding
Since this lab is intended to support Ceph, OpenStack, Kubernetes, and Slurm, I’d make one small improvement to the original plan:
Configure Jumbo Frames (MTU 9000) on vmbr1, vmbr2, and vmbr3 now, while leaving vmbr0 at the standard MTU of 1500 for compatibility with your home network.
For example:
vmbr0 → MTU 1500 (Management)
vmbr1 → MTU 9000 (Ceph)
vmbr2 → MTU 9000 (Tenant)
vmbr3 → MTU 9000 (External)
You can keep the physical nic0 at 1500 for now. When you eventually upgrade to a dedicated 10 GbE NIC and a managed switch that supports jumbo frames, the logical bridge configuration will already be in place—you’ll only need to move the bridge onto the new interface and adjust the NIC MTU. This avoids redesigning the network later while keeping your current setup compatible with your home LAN.
Ansible Network Config Tasks
- name: Configure Proxmox virtual bridges
  hosts: proxmox
  become: true
  vars:
    ceph_bridge_ip_map:
      pve0: "172.16.10.11/24"
      pve1: "172.16.10.12/24"
      pve2: "172.16.10.13/24"

  tasks:
    - name: Backup current network interfaces file
      ansible.builtin.copy:
        src: /etc/network/interfaces
        dest: "/etc/network/interfaces.backup-{{ ansible_date_time.iso8601_basic_short }}"
        remote_src: true
        mode: "0644"

    - name: Ensure vmbr1 Ceph bridge exists
      ansible.builtin.blockinfile:
        path: /etc/network/interfaces
        marker: "# {mark} ANSIBLE MANAGED vmbr1-ceph"
        block: |
          auto vmbr1
          iface vmbr1 inet static
              address {{ ceph_bridge_ip_map[inventory_hostname] }}
              bridge-ports none
              bridge-stp off
              bridge-fd 0
              bridge-vlan-aware yes

    - name: Ensure vmbr2 OpenStack tenant bridge exists
      ansible.builtin.blockinfile:
        path: /etc/network/interfaces
        marker: "# {mark} ANSIBLE MANAGED vmbr2-openstack-tenant"
        block: |
          auto vmbr2
          iface vmbr2 inet manual
              bridge-ports none
              bridge-stp off
              bridge-fd 0
              bridge-vlan-aware yes

    - name: Ensure vmbr3 external bridge exists
      ansible.builtin.blockinfile:
        path: /etc/network/interfaces
        marker: "# {mark} ANSIBLE MANAGED vmbr3-external"
        block: |
          auto vmbr3
          iface vmbr3 inet manual
              bridge-ports none
              bridge-stp off
              bridge-fd 0
              bridge-vlan-aware yes

    - name: Apply network configuration safely
      ansible.builtin.command: ifreload -a
      changed_when: true

    - name: Verify bridges exist
      ansible.builtin.command: ip -br link show
      register: bridge_check
      changed_when: false

    - name: Show bridge status
      ansible.builtin.debug:
        var: bridge_check.stdout_lines
Ansible bootstrap run
PLAY [Configure Proxmox virtual bridges] **************************************************************************

TASK [Gathering Facts] ********************************************************************************************
ok: [pve0]

TASK [Backup current network interfaces file] *********************************************************************
changed: [pve0]

TASK [Ensure vmbr1 Ceph bridge exists] ****************************************************************************
changed: [pve0]

TASK [Ensure vmbr2 OpenStack tenant bridge exists] ****************************************************************
changed: [pve0]

TASK [Ensure vmbr3 external bridge exists] ************************************************************************
changed: [pve0]

TASK [Apply network configuration safely] *************************************************************************
changed: [pve0]

TASK [Verify bridges exist] ***************************************************************************************
ok: [pve0]

TASK [Show bridge status] *****************************************************************************************
ok: [pve0] => {
    "bridge_check.stdout_lines": [
        "lo               UNKNOWN        00:00:00:00:00:00 <LOOPBACK,UP,LOWER_UP> ",
        "nic0             UP             18:03:73:45:71:4e <BROADCAST,MULTICAST,UP,LOWER_UP> ",
        "vmbr0            UP             18:03:73:45:71:4e <BROADCAST,MULTICAST,UP,LOWER_UP> ",
        "tap101i0         UNKNOWN        16:00:5d:ed:28:92 <BROADCAST,MULTICAST,PROMISC,UP,LOWER_UP> ",
        "vmbr1            UNKNOWN        ea:02:df:43:aa:80 <BROADCAST,MULTICAST,UP,LOWER_UP> ",
        "vmbr2            UNKNOWN        8e:bf:6a:77:74:db <BROADCAST,MULTICAST,UP,LOWER_UP> ",
        "vmbr3            UNKNOWN        fe:0f:95:62:ae:c2 <BROADCAST,MULTICAST,UP,LOWER_UP> "
    ]
}

PLAY RECAP ********************************************************************************************************
pve0                       : ok=21   changed=5    unreachable=0    failed=0    skipped=1    rescued=0    ignored=0
Network Config Verification
CLI
root@pve0:~# ip a
1: lo: <LOOPBACK,UP,LOWER_UP> mtu 65536 qdisc noqueue state UNKNOWN group default qlen 1000
    link/loopback 00:00:00:00:00:00 brd 00:00:00:00:00:00
    inet 127.0.0.1/8 scope host lo
       valid_lft forever preferred_lft forever
    inet6 ::1/128 scope host noprefixroute
       valid_lft forever preferred_lft forever
2: nic0: <BROADCAST,MULTICAST,UP,LOWER_UP> mtu 1500 qdisc mq master vmbr0 state UP group default qlen 1000
    link/ether 18:03:73:45:71:4e brd ff:ff:ff:ff:ff:ff
    altname enx18037345714e
3: vmbr0: <BROADCAST,MULTICAST,UP,LOWER_UP> mtu 1500 qdisc noqueue state UP group default qlen 1000
    link/ether 18:03:73:45:71:4e brd ff:ff:ff:ff:ff:ff
    inet 192.168.1.10/24 scope global vmbr0
       valid_lft forever preferred_lft forever
    inet6 fe80::1a03:73ff:fe45:714e/64 scope link proto kernel_ll
       valid_lft forever preferred_lft forever
4: tap101i0: <BROADCAST,MULTICAST,PROMISC,UP,LOWER_UP> mtu 1500 qdisc fq_codel master vmbr0 state UNKNOWN group default qlen 1000
    link/ether 16:00:5d:ed:28:92 brd ff:ff:ff:ff:ff:ff
5: vmbr1: <BROADCAST,MULTICAST,UP,LOWER_UP> mtu 1500 qdisc noqueue state UNKNOWN group default qlen 1000
    link/ether ea:02:df:43:aa:80 brd ff:ff:ff:ff:ff:ff
    inet 172.16.10.11/24 scope global vmbr1
       valid_lft forever preferred_lft forever
    inet6 fe80::e802:dfff:fe43:aa80/64 scope link proto kernel_ll
       valid_lft forever preferred_lft forever
6: vmbr2: <BROADCAST,MULTICAST,UP,LOWER_UP> mtu 1500 qdisc noqueue state UNKNOWN group default qlen 1000
    link/ether 8e:bf:6a:77:74:db brd ff:ff:ff:ff:ff:ff
    inet6 fe80::8cbf:6aff:fe77:74db/64 scope link proto kernel_ll
       valid_lft forever preferred_lft forever
7: vmbr3: <BROADCAST,MULTICAST,UP,LOWER_UP> mtu 1500 qdisc noqueue state UNKNOWN group default qlen 1000
    link/ether fe:0f:95:62:ae:c2 brd ff:ff:ff:ff:ff:ff
    inet6 fe80::fc0f:95ff:fe62:aec2/64 scope link proto kernel_ll
       valid_lft forever preferred_lft forever
Proxmox UI