
Creating Ubuntu 24.04 cloud-init template
First check what currently exists:
qm status 9000
qm config 9000
If 9000 already exists and you want to replace it:
qm stop 9000 2>/dev/null || true
qm unlock 9000 2>/dev/null || true
qm destroy 9000 --purge
Check for old leftover disks:
pvesm list ceph-vm | grep 9000 || true
pvesm list local-lvm | grep 9000 || true
If you see old 9000 disks after destroy, remove only those clearly belonging to VMID 9000.
Example:
pvesm free ceph-vm:vm-9000-disk-0
pvesm free ceph-vm:vm-9000-cloudinit
1. Install required tools on pve0
apt update
apt install -y wget libguestfs-tools
Set libguestfs to use direct mode:
export LIBGUESTFS_BACKEND=directMake it persistent for this root shell if desired:
echo 'export LIBGUESTFS_BACKEND=direct' >> /root/.bashrc2. Download a fresh Ubuntu 24.04 cloud image
mkdir -p /var/lib/vz/template/iso
cd /var/lib/vz/template/iso

rm -f noble-server-cloudimg-amd64.img
rm -f ubuntu-24.04-server-cloudimg-amd64.img

wget -O ubuntu-24.04-server-cloudimg-amd64.img \
  https://cloud-images.ubuntu.com/noble/current/noble-server-cloudimg-amd64.img
Check it exists:
ls -lh ubuntu-24.04-server-cloudimg-amd64.img3. Create the sont public key file
Create a public key file on pve0.
Use your actual public key. Based on what you used earlier, this example uses your existing sont@blusas.co.uk key.
cat > /tmp/sont.pub <<'EOF'
ssh-rsa AAAAB3NzaC1yc2EAAAADAQABAAACAQCtlXjKmo9ww04QhCd34K5Z3LCScMiOSCNI/WWJdLmzuKz8BINOjpsmLXFXl3W7o/dWRbceRxqe60JOEjtCP7NQNx9LNPn4rWHSwbktxiHB8BEQLCYX1NbKVks5stGvYQhFx8tzUPz4q5HfFOQ9dNXcSVJRSn65JXh25nDQZV7SJ+W7PKnN3fj5ot94XYr17X9QNgfvrSxIVhHqN0H3cf9j27uEAwrROdNVqj3OX8atKvhloBnc5pqXXJG3FBJT5g0VwY1b0zYe8t9LVNViOr+ML2vQiQaNbvzDyy9g2+WcuFxBHDjVfpPhAR4EUK8jRFrSF759YNkAk98zTJAxOa2B2QYsQ8X7X2aX11Z/oO1Drat6myo8mvc8H8+EHfkt4X+ydhnlme7agyHupZeSf5tgdQRPz5cyuUH1oqWq0cm4RafLcpBaTUbmpc5zcRr3UKpUTGj4SsKWJ2KzmiXI2WdgIUh+zcR+Umeu/TcF4Mo1we/5U8w31ER8ritQnQjd7Yo3dlabu/m4DjVOtJK2ZaQTMXjExfQWRF+lNhD41igmOIpZWSZ8ZkcrPLHqPTRdvXkCadu3hpWFGe/zsFP03yoJtmShTA6GaUFx5nQem6SQFqZJBKJPD78Hpg5ZeyH0deZF5M4+WhMg1vL0kNuuzUUM3I04pVzczp3A43MDqYMSjQ== sont@blusas.co.uk
EOF
Verify:
cat /tmp/sont.pub4. Inject the sont user, passwordless sudo, and QEMU guest agent
Run this against the downloaded image:
virt-customize -a ubuntu-24.04-server-cloudimg-amd64.img \
  --install qemu-guest-agent,cloud-init,cloud-guest-utils,sudo,bash,curl,wget,vim,net-tools,iproute2 \
  --run-command 'useradd -m -s /bin/bash -G sudo,adm sont || true' \
  --mkdir /home/sont/.ssh \
  --upload /tmp/sont.pub:/home/sont/.ssh/authorized_keys \
  --run-command 'chown -R sont:sont /home/sont/.ssh' \
  --run-command 'chmod 700 /home/sont/.ssh' \
  --run-command 'chmod 600 /home/sont/.ssh/authorized_keys' \
  --run-command 'echo "sont ALL=(ALL) NOPASSWD:ALL" > /etc/sudoers.d/90-sont-nopasswd' \
  --run-command 'chmod 0440 /etc/sudoers.d/90-sont-nopasswd' \
  --run-command 'systemctl enable qemu-guest-agent' \
  --run-command 'cloud-init clean --logs' \
  --truncate /etc/machine-id \
  --run-command 'rm -f /var/lib/dbus/machine-id' \
  --run-command 'ln -sf /etc/machine-id /var/lib/dbus/machine-id'
If you get a libguestfs error, re-run:
export LIBGUESTFS_BACKEND=directThen repeat the virt-customize command.
5. Create the Proxmox VM shell for the template
Create VMID 9000 with the name ubuntu-24-template:
qm create 9000 \
  --name ubuntu-24-template \
  --memory 2048 \
  --cores 2 \
  --cpu host \
  --net0 virtio,bridge=vmbr0,firewall=0 \
  --scsihw virtio-scsi-single \
  --serial0 socket \
  --vga serial0 \
  --agent enabled=1,fstrim_cloned_disks=1,type=virtio \
  --ostype l26 \
  --onboot 0
6. Import the Ubuntu disk into ceph-vm
qm importdisk 9000 ubuntu-24.04-server-cloudimg-amd64.img ceph-vm --format rawCheck that the imported disk exists:
pvesm list ceph-vm | grep 9000You should see something like:
ceph-vm:vm-9000-disk-07. Attach the imported disk
qm set 9000 \
  --scsi0 ceph-vm:vm-9000-disk-0,discard=on,ssd=1,iothread=1
Set boot order:
qm set 9000 --boot order=scsi08. Add Cloud-Init drive
qm set 9000 --ide2 ceph-vm:cloudinitSet Cloud-Init user to sont:
qm set 9000 --ciuser sontInject the public key through Proxmox Cloud-Init as well:
qm set 9000 --sshkeys /tmp/sont.pubSet DNS defaults:
qm set 9000 --nameserver "192.168.1.1 1.1.1.1"For template testing, give it a temporary static IP:
qm set 9000 \
  --ipconfig0 ip=192.168.1.99/24,gw=192.168.1.1
Regenerate the Cloud-Init ISO:
qm cloudinit update 90009. Verify the template VM config before booting
qm config 9000You want to see these key lines:
name: ubuntu-24-template
agent: enabled=1,...
boot: order=scsi0
ciuser: sont
ide2: ceph-vm:vm-9000-cloudinit,media=cdrom
ipconfig0: ip=192.168.1.99/24,gw=192.168.1.1
nameserver: 192.168.1.1 1.1.1.1
net0: virtio=...,bridge=vmbr0,firewall=0
scsi0: ceph-vm:vm-9000-disk-0,...
serial0: socket
vga: serial0
10. Start the VM for testing
qm start 9000Wait 60–90 seconds.
Then try SSH:
ssh sont@192.168.1.99 hostnameTest passwordless sudo:
ssh sont@192.168.1.99 "whoami; sudo whoami"Expected:
sont
root
Test QEMU guest agent:
qm agent 9000 pingExpected:
successfully pinged guest agentCheck Cloud-Init status:
ssh sont@192.168.1.99 "cloud-init status --long"Expected:
status: done11. Clean the VM before converting to template
SSH into the VM and clean it:
ssh sont@192.168.1.99 '
  sudo cloud-init clean --logs
  sudo truncate -s 0 /etc/machine-id
  sudo rm -f /var/lib/dbus/machine-id
  sudo ln -sf /etc/machine-id /var/lib/dbus/machine-id
  sudo apt autoremove -y
  sudo apt clean
  history -c
  sudo shutdown -h now
'
Wait until it is stopped:
qm status 9000Expected:
status: stoppedIf it does not shut down cleanly after a minute:
qm stop 9000 --skiplock 112. Remove the temporary test IP before making it the final template
You can leave ciuser and SSH key, but remove the temporary 192.168.1.99 address so Terraform can set per-VM IPs later.
Set it back to DHCP:
qm set 9000 --ipconfig0 ip=dhcpOr remove the IP config entirely:
qm set 9000 --delete ipconfig0For Terraform-managed clones, I prefer removing it:
qm set 9000 --delete ipconfig0Regenerate Cloud-Init:
qm cloudinit update 900013. Convert VM 9000 to a template
qm template 9000Verify:
qm config 9000 | egrep 'name|template|agent|ciuser|ide2|net0|scsi0|boot|serial0'Expected:
name: ubuntu-24-template
template: 1
agent: enabled=1,...
ciuser: sont
ide2: ceph-vm:vm-9000-cloudinit,media=cdrom
net0: virtio=...,bridge=vmbr0,firewall=0
scsi0: ceph-vm:vm-9000-disk-0,...
boot: order=scsi0
serial0: socket
14. Terraform settings to use this template
In terraform.tfvars:
template_vm_id = 9000
template_node  = "pve0"

vm_user = "sont"

datastore_id            = "ceph-vm"
cloud_init_datastore_id = "ceph-vm"
efi_datastore_id        = "ceph-vm"

ssh_public_keys = [
  "ssh-rsa AAAAB3NzaC1yc2EAAAADAQABAAACAQCtlXjKmo9ww04QhCd34K5Z3LCScMiOSCNI/WWJdLmzuKz8BINOjpsmLXFXl3W7o/dWRbceRxqe60JOEjtCP7NQNx9LNPn4rWHSwbktxiHB8BEQLCYX1NbKVks5stGvYQhFx8tzUPz4q5HfFOQ9dNXcSVJRSn65JXh25nDQZV7SJ+W7PKnN3fj5ot94XYr17X9QNgfvrSxIVhHqN0H3cf9j27uEAwrROdNVqj3OX8atKvhloBnc5pqXXJG3FBJT5g0VwY1b0zYe8t9LVNViOr+ML2vQiQaNbvzDyy9g2+WcuFxBHDjVfpPhAR4EUK8jRFrSF759YNkAk98zTJAxOa2B2QYsQ8X7X2aX11Z/oO1Drat6myo8mvc8H8+EHfkt4X+ydhnlme7agyHupZeSf5tgdQRPz5cyuUH1oqWq0cm4RafLcpBaTUbmpc5zcRr3UKpUTGj4SsKWJ2KzmiXI2WdgIUh+zcR+Umeu/TcF4Mo1we/5U8w31ER8ritQnQjd7Yo3dlabu/m4DjVOtJK2ZaQTMXjExfQWRF+lNhD41igmOIpZWSZ8ZkcrPLHqPTRdvXkCadu3hpWFGe/zsFP03yoJtmShTA6GaUFx5nQem6SQFqZJBKJPD78Hpg5ZeyH0deZF5M4+WhMg1vL0kNuuzUUM3I04pVzczp3A43MDqYMSjQ== sont@blusas.co.uk"
]
Make sure your Terraform initialization block uses:
user_account {
  username = var.vm_user
  keys     = var.ssh_public_keys
}
15. Quick clone test
Before rebuilding all OpenStack VMs, test one clone manually:
qm clone 9000 9100 \
  --name test-ubuntu-24 \
  --full 1 \
  --storage ceph-vm
Set a test IP:
qm set 9100 \
  --ipconfig0 ip=192.168.1.98/24,gw=192.168.1.1 \
  --nameserver "192.168.1.1 1.1.1.1"
Regenerate Cloud-Init:
qm cloudinit update 9100Start it:
qm start 9100Test:
ssh sont@192.168.1.98 "hostname; whoami; sudo whoami"
qm agent 9100 ping
Expected:
test-ubuntu-24
sont
root
successfully pinged guest agent
Destroy the test clone:
qm stop 9100 2>/dev/null || true
qm destroy 9100 --purge
At that point, ubuntu-24-template is ready for Terraform and your OpenStack lab.
Creating the OpenStack Cluster using Terraform
OpenStack Step 1 Terraform for Proxmox VE 9.x
This Terraform project creates the three Ubuntu 24.04 VMs used for the first OpenStack/Kolla-Ansible lab step on a 3-node Proxmox cluster.
It is designed for this lab topology:
| VM name | VMID | Proxmox node | OpenStack role | IP address | vCPU | RAM | Disk |
|---|---|---|---|---|---|---|---|
ctrl | 1210 | pve1 | Control plane / network / storage / monitoring | 192.168.1.51/24 | 8 | 16 GB | 100 GB |
cmp | 1211 | pve2 | Nova compute | 192.168.1.52/24 | 16 | 64 GB | 100 GB |
gpu | 1212 | pve0 | Nova compute, GPU-capable later | 192.168.1.53/24 | 8 | 32 GB | 100 GB |
The default VM names are deliberately short because they become hostnames and Kolla-Ansible inventory names.
What this creates
Terraform creates one Proxmox VM for each item in var.vms.
Each VM is:
- cloned from the Ubuntu 24.04 cloud-init template VM
9000 - stored on
ceph-vm - connected to
vmbr0 - assigned a static cloud-init IP address
- started automatically
The VMs use:
| Setting | Value |
|---|---|
| Ubuntu template | ubuntu-24-template |
| Template VMID | 9000 |
| Template node | pve0 |
| Disk storage | ceph-vm |
| Cloud-init storage | ceph-vm |
| Bridge | vmbr0 |
| Cloud-init user | sont |
| CPU type | host |
| Machine type | q35 |
| Firmware | OVMF / UEFI |
| SCSI controller | virtio-scsi-single |
| QEMU guest agent | enabled |
Files
| File | Purpose |
|---|---|
versions.tf | Pins Terraform and provider versions. |
provider.tf | Configures the Proxmox provider. |
variables.tf | Defines API, template, network, storage, user, GPU, and VM variables. |
main.tf | Creates the three Proxmox VMs. |
outputs.tf | Generates VM summary, /etc/hosts entries, SSH checks, and Kolla-Ansible inventory. |
terraform.tfvars.example | Safe example configuration. |
terraform.tfvars | Working lab values. Replace the API token before use. |
automation_user.sh | Creates the Proxmox API user and token for Terraform. |
Prerequisites
Before running Terraform, confirm the following are complete.
1. Proxmox cluster
The cluster should contain:
pve0pve1pve2
Check from any node:
pvecm status
pvesh get /cluster/resources --type node
2. Shared VM storage
The storage ceph-vm must exist and be visible on all three nodes:
pvesm statusExpected result: ceph-vm appears as active storage.
3. Ubuntu 24.04 template
Create a Proxmox template named:
ubuntu-24-templatewith VMID:
9000The template should already contain:
- user
sont - passwordless sudo for
sont qemu-guest-agentcloud-initcloud-guest-utils- serial console support
- cloud-init drive
- network device on
vmbr0
Verify:
qm config 9000 | egrep 'name|template|agent|ciuser|ide2|net0|scsi0|boot|serial0'Expected important lines:
name: ubuntu-24-template
template: 1
agent: enabled=1,...
ciuser: sont
ide2: ceph-vm:...cloudinit...
net0: virtio=...,bridge=vmbr0,...
scsi0: ceph-vm:vm-9000-disk-0,...
boot: order=scsi0
serial0: socket
4. Nested virtualisation
OpenStack compute VMs need nested KVM. Enable nested virtualisation on all Proxmox hosts.
For Intel hosts:
cat >/etc/modprobe.d/kvm-intel.conf <<'NESTED_EOF'
options kvm-intel nested=1
NESTED_EOF
reboot
After reboot:
cat /sys/module/kvm_intel/parameters/nestedExpected:
Y5. Terraform API user
Run on a Proxmox node as root:
./automation_user.shThe token secret is printed once. Put it in terraform.tfvars as:
proxmox_api_token = "terraform@pve!openstack=TOKEN_SECRET_HERE"Quick start
cp terraform.tfvars.example terraform.tfvars
vi terraform.tfvars
terraform init
terraform fmt
terraform validate
terraform plan
terraform apply
Important configuration values
In terraform.tfvars:
proxmox_endpoint  = "https://pve0:8006/"
proxmox_api_token = "terraform@pve!openstack=REPLACE_WITH_TOKEN_SECRET"

vm_user                      = "sont"
ansible_ssh_private_key_file = "~/.ssh/id_rsa"

template_vm_id          = 9000
template_node           = "pve0"
datastore_id            = "ceph-vm"
cloud_init_datastore_id = "ceph-vm"
bridge                  = "vmbr0"
gateway                 = "192.168.1.1"
dns_servers             = ["192.168.1.1", "1.1.1.1"]
gpu_mapping_name        = "pve0-gpu"
The vm_user value is used by cloud-init and in the generated Kolla-Ansible inventory. It should match the user baked into the template.
GPU passthrough
The gpu VM is placed on pve0 because that is the GPU-capable Proxmox host.
By default, GPU passthrough is disabled:
gpu_passthrough = falseKeep it disabled for the initial Kolla-Ansible OpenStack deployment.
Only enable it later after the base cloud is healthy:
gpu_passthrough = trueBefore enabling it, create a Proxmox Datacenter PCI resource mapping named:
pve0-gpuOtherwise the VM will fail to start with:
PCI device mapping not found for 'pve0-gpu'Useful outputs
After terraform apply, show the generated inventory:
terraform output kolla_inventoryShow /etc/hosts entries:
terraform output hosts_entriesShow SSH checks:
terraform output ssh_test_commandsValidation after apply
Check Proxmox placement:
pvesh get /cluster/resources --type vm | egrep '1210|1211|1212'Expected:
1210 ctrl pve1 running
1211 cmp  pve2 running
1212 gpu  pve0 running
Check SSH:
ssh sont@192.168.1.51 hostname
ssh sont@192.168.1.52 hostname
ssh sont@192.168.1.53 hostname
Check passwordless sudo:
ssh sont@192.168.1.51 'sudo whoami'
ssh sont@192.168.1.52 'sudo whoami'
ssh sont@192.168.1.53 'sudo whoami'
Expected:
rootCheck QEMU guest agent from the correct Proxmox hosts:
ssh root@pve1 'qm agent 1210 ping'
ssh root@pve2 'qm agent 1211 ping'
ssh root@pve0 'qm agent 1212 ping'
Expected:
successfully pinged guest agentCheck nested KVM on compute VMs:
ssh sont@192.168.1.52 "egrep -c '(vmx|svm)' /proc/cpuinfo"
ssh sont@192.168.1.53 "egrep -c '(vmx|svm)' /proc/cpuinfo"
Expected result: a number greater than 0.
Then install and run kvm-ok:
ssh sont@192.168.1.52 'sudo apt update && sudo apt install -y cpu-checker && kvm-ok'
ssh sont@192.168.1.53 'sudo apt update && sudo apt install -y cpu-checker && kvm-ok'
Expected:
KVM acceleration can be usedDestroy / rebuild
To destroy only these OpenStack lab VMs:
terraform destroy \
  -target='proxmox_virtual_environment_vm.openstack["ctrl"]' \
  -target='proxmox_virtual_environment_vm.openstack["cmp"]' \
  -target='proxmox_virtual_environment_vm.openstack["gpu"]'
If Proxmox refresh hangs, use:
terraform destroy \
  -refresh=false \
  -target='proxmox_virtual_environment_vm.openstack["ctrl"]' \
  -target='proxmox_virtual_environment_vm.openstack["cmp"]' \
  -target='proxmox_virtual_environment_vm.openstack["gpu"]'
Common issues
QEMU guest agent timeout
Terraform may warn that it is waiting for network interfaces from the QEMU agent.
Usually this means the VM booted, but the guest agent has not responded yet.
Check that the template has qemu-guest-agent installed and enabled.
VM created on wrong storage
Check:
pvesm list ceph-vm | egrep '1210|1211|1212'
pvesm list local-lvm | egrep '1210|1211|1212'
All lab disks should be on ceph-vm.
GPU VM fails to start
If you see:
PCI device mapping not found for 'pve0-gpu'Either:
- set
gpu_passthrough = false, or - create the
pve0-gpuPCI mapping first.
OpenStack Proxmox Terraform Actions
This explains what the Terraform files do when creating the three Ubuntu 24.04 VMs for the OpenStack/Kolla-Ansible lab on the Proxmox cluster.
1. High-level purpose
The Terraform project creates this OpenStack lab foundation:
| Terraform key | VM name | VMID | Proxmox node | Role | IP address | Purpose |
|---|---|---|---|---|---|---|
ctrl | ctrl | 1210 | pve1 | control | 192.168.1.51/24 | OpenStack control plane, API, network, storage, and monitoring services |
cmp | cmp | 1211 | pve2 | compute | 192.168.1.52/24 | Nova compute node |
gpu | gpu | 1212 | pve0 | compute-gpu | 192.168.1.53/24 | Nova compute node reserved for future GPU passthrough work |
The gpu VM is intentionally pinned to pve0 because pve0 is the Proxmox host with the GPU.
2. Files and responsibilities
| File | What it does |
|---|---|
versions.tf | Requires Terraform >= 1.6.0 and the bpg/proxmox provider ~> 0.87. |
provider.tf | Connects Terraform to Proxmox using the API endpoint and API token. |
variables.tf | Defines all configurable values: API access, template, storage, networking, SSH user, GPU mapping, and VM map. |
main.tf | Creates the actual Proxmox VMs. |
outputs.tf | Prints VM summary, /etc/hosts entries, SSH commands, and a Kolla-Ansible inventory. |
terraform.tfvars | Provides the concrete values for this lab. |
automation_user.sh | Creates the Proxmox terraform@pve API user and openstack token. |
3. Terraform command flow
3.1 terraform init
Command:
terraform initActions taken:
- Reads
versions.tf. - Checks that the local Terraform CLI version is
>= 1.6.0. - Downloads the Proxmox provider from
bpg/proxmox. - Installs a compatible provider version matching
~> 0.87. - Creates the local
.terraform/provider/plugin directory. - Creates or updates
.terraform.lock.hclwith the selected provider checksums.
No VMs are created during terraform init.
3.2 terraform fmt
Command:
terraform fmtActions taken:
- Rewrites
.tffiles into canonical Terraform formatting. - Aligns indentation and block layout.
- Does not contact Proxmox.
- Does not create or modify VMs.
3.3 terraform validate
Command:
terraform validateActions taken:
- Checks that the Terraform syntax is valid.
- Checks that variables, references, resource names, and output references are valid.
- Confirms that provider schema usage is structurally valid.
- Does not contact Proxmox for live changes.
- Does not create or modify VMs.
3.4 terraform plan
Command:
terraform planActions taken:
- Reads all configuration files.
- Reads
terraform.tfvars. - Connects to Proxmox using the configured API endpoint and API token.
- Refreshes existing state if VMs already exist.
- Compares desired state against actual Proxmox state.
- Shows which VMs will be created, changed, or destroyed.
The expected first-run plan is to create three resources:
proxmox_virtual_environment_vm.openstack["ctrl"]
proxmox_virtual_environment_vm.openstack["cmp"]
proxmox_virtual_environment_vm.openstack["gpu"]
No VM changes are made until terraform apply is run.
3.5 terraform apply
Command:
terraform applyActions taken:
- Shows the execution plan.
- Waits for confirmation unless run with
-auto-approve. - Creates or updates Proxmox VM resources.
- Writes the resulting resource IDs into Terraform state.
- Prints outputs from
outputs.tf.
For this project, terraform apply creates three Proxmox VMs from the var.vms map.
4. Provider configuration actions
The provider connects Terraform to your Proxmox cluster.
Terraform therefore:
- Connects to the Proxmox API endpoint.
- Authenticates with the
terraform@pve!openstackAPI token. - Accepts the self-signed lab certificate when
proxmox_insecure = true. - Uses SSH agent support with user
rootfor provider operations that require SSH.
The provider configuration is conceptually:
provider "proxmox" {
  endpoint  = var.proxmox_endpoint
  api_token = var.proxmox_api_token
  insecure  = var.proxmox_insecure

  ssh {
    agent    = true
    username = var.proxmox_ssh_user
  }
}
5. VM creation loop
The core resource is:
resource "proxmox_virtual_environment_vm" "openstack" {
  for_each = var.vms
  ...
}
This means Terraform does not define three separate VM resources manually. Instead, it loops through the vms map and creates one VM per map entry.
Current default entries:
ctrl
cmp
gpu
The resource addresses are therefore:
proxmox_virtual_environment_vm.openstack["ctrl"]
proxmox_virtual_environment_vm.openstack["cmp"]
proxmox_virtual_environment_vm.openstack["gpu"]
6. Actions taken for each VM
For every VM in var.vms, Terraform performs the following actions.
6.1 Sets name, description, and tags
Terraform sets the VM name from the map key and creates a description from the OpenStack role.
Result:
| VM | Description | Tags |
|---|---|---|
ctrl | OpenStack lab control VM managed by Terraform | terraform, openstack, kolla, ubuntu-24-04, control |
cmp | OpenStack lab compute VM managed by Terraform | terraform, openstack, kolla, ubuntu-24-04, compute |
gpu | OpenStack lab compute-gpu VM managed by Terraform | terraform, openstack, kolla, ubuntu-24-04, compute-gpu |
Terraform also ignores future tag drift, so manual tag changes in the Proxmox UI do not cause repeated Terraform updates.
6.2 Places each VM on the correct Proxmox node
Terraform uses each VM’s configured node and VMID.
Result:
| VM | VMID | Node |
|---|---|---|
ctrl | 1210 | pve1 |
cmp | 1211 | pve2 |
gpu | 1212 | pve0 |
This fixes the earlier issue where VMs appeared to be created on pve0 and then moved. The desired final placement is explicit per VM.
6.3 Starts VMs and enables boot-on-host-start
Terraform configures each VM to:
- Start after creation.
- Start automatically when its Proxmox host boots.
- Stop cleanly before destroy when Terraform destroys it.
Equivalent behaviour:
started         = true
on_boot         = true
stop_on_destroy = true
6.4 Uses Q35 and OVMF / UEFI
Terraform creates modern VM hardware using:
machine = "q35"
bios    = "ovmf"
Actions:
- Creates modern Q35 machine type VMs.
- Uses OVMF/UEFI firmware rather than legacy SeaBIOS.
- Creates an EFI disk.
- Stores the EFI disk on
ceph-vm. - Disables Secure Boot pre-enrolled keys.
The EFI disk is configured conceptually as:
efi_disk {
  datastore_id      = var.datastore_id
  type              = "4m"
  pre_enrolled_keys = false
}
6.5 Clones from the Ubuntu template
Terraform clones from the Ubuntu 24.04 template.
Default values:
template_vm_id = 9000
template_node  = "pve0"
datastore_id   = "ceph-vm"
Actions:
- Finds template VM
9000onpve0. - Performs a full clone.
- Places the cloned disk on
ceph-vm. - Retries clone operations up to three times if Proxmox has a transient failure.
Important requirement: template 9000 must be a working Ubuntu 24.04 cloud-init template.
6.6 Enables QEMU guest agent
Terraform enables Proxmox-side QEMU guest agent support:
agent {
  enabled = true
  trim    = true
}
Actions:
- Enables Proxmox-side QEMU guest agent support.
- Enables guest disk trim support.
The Ubuntu template must also have qemu-guest-agent installed and enabled inside the guest. Terraform only enables the Proxmox VM setting; it cannot make a missing guest package respond.
Validation commands:
ssh root@pve1 'qm agent 1210 ping'
ssh root@pve2 'qm agent 1211 ping'
ssh root@pve0 'qm agent 1212 ping'
6.7 Configures CPU for nested virtualisation
Terraform sets CPU type to host and enables NUMA awareness.
Actions:
- Allocates the requested number of vCPU cores.
- Exposes host CPU features to the guest.
- Enables NUMA awareness.
Using CPU type host is important because OpenStack compute nodes need nested KVM support inside the VM.
Result:
| VM | Cores |
|---|---|
ctrl | 8 |
cmp | 16 |
gpu | 8 |
Validation:
ssh sont@192.168.1.52 "egrep -c '(vmx|svm)' /proc/cpuinfo"
ssh sont@192.168.1.53 "egrep -c '(vmx|svm)' /proc/cpuinfo"
6.8 Configures memory
Terraform allocates both dedicated and floating/balloon memory.
Result:
| VM | Memory |
|---|---|
ctrl | 16 GB |
cmp | 64 GB |
gpu | 32 GB |
6.9 Configures SCSI controller
Terraform uses:
scsi_hardware = "virtio-scsi-single"Actions:
- Uses a VirtIO SCSI controller.
- Matches a common performant Proxmox Linux VM layout.
6.10 Creates the OS disk
Terraform creates the main OS disk as scsi0.
Actions:
- Creates
scsi0for each VM. - Stores the disk on
ceph-vm. - Resizes it to 100 GB.
- Uses raw format.
- Enables discard/TRIM.
- Enables I/O thread.
- Marks the disk as SSD.
Result:
| VM | Disk | Storage |
|---|---|---|
ctrl | 100 GB | ceph-vm |
cmp | 100 GB | ceph-vm |
gpu | 100 GB | ceph-vm |
Validation:
pvesm list ceph-vm | egrep '1210|1211|1212'
pvesm list local-lvm | egrep '1210|1211|1212'
Expected: disks appear on ceph-vm, not local-lvm.
6.11 Configures Cloud-Init
Terraform creates and configures the cloud-init data for each VM.
Actions:
- Creates a cloud-init disk on
ceph-vm. - Injects the static IPv4 address for each VM.
- Injects the default gateway.
- Injects DNS servers.
- Creates/configures the cloud-init user from
var.vm_user. - Injects the SSH public key into that user.
The fixed issue here is important: the previous version hardcoded the user as ubuntu. The corrected configuration uses:
username = var.vm_userWith:
vm_user = "sont"Result:
| VM | IP | User |
|---|---|---|
ctrl | 192.168.1.51/24 | sont |
cmp | 192.168.1.52/24 | sont |
gpu | 192.168.1.53/24 | sont |
6.12 Adds network device
Terraform adds one NIC to each VM.
Actions:
- Adds one NIC to each VM.
- Connects it to
vmbr0. - Uses VirtIO model.
Result:
net0: virtio=...,bridge=vmbr06.13 Sets Linux OS type
Terraform marks the guest OS as a modern Linux 2.6+ kernel family in Proxmox:
operating_system {
  type = "l26"
}
6.14 Adds serial console
Terraform adds a serial device to support cloud-image console access.
This matches the Ubuntu cloud image template style using serial console output.
6.15 Optional GPU passthrough
Terraform uses a conditional dynamic block for GPU passthrough.
Behaviour:
- If
gpu_passthrough = false, no PCI device is attached. - If
gpu_passthrough = true, Terraform adds a PCI device using the Proxmox Datacenter resource mapping named byvar.gpu_mapping_name.
Default:
gpu_passthrough = falseRecommended for the initial OpenStack deployment: keep it false.
If enabling later, create this mapping first:
pve0-gpuOtherwise VM 1212 will fail to start.
7. Outputs generated after apply
7.1 vm_summary
Prints a structured object showing VM ID, node, IP, role, CPU, memory, and disk.
Example:
terraform output vm_summary7.2 hosts_entries
Prints static host entries:
192.168.1.51 ctrl
192.168.1.52 cmp
192.168.1.53 gpu
Use them in /etc/hosts on the deployment VM and optionally on all OpenStack nodes.
7.3 kolla_inventory
Generates a Kolla-Ansible inventory.
It places:
ctrlin[control],[network],[storage], and[monitoring]cmpandgpuin[compute]localhostin[deployment]
Example usage:
terraform output -raw kolla_inventory > multinode7.4 ssh_test_commands
Prints SSH validation commands for all VMs:
terraform output ssh_test_commands8. Corrected issues
The fixed Terraform set addresses these issues:
| Issue | Old behaviour | Fixed behaviour |
|---|---|---|
| Cloud-init user mismatch | username = "ubuntu" | username = var.vm_user |
| Default VM user | Ubuntu user assumed | vm_user = "sont" |
| README name mismatch | controller01, compute01, compute02 | ctrl, cmp, gpu |
| Static inventory hardcoding | Fixed inventory text | Dynamic output from var.vms |
| GPU safety | Could attach GPU prematurely | Disabled by default and conditional |
| Storage clarity | Could drift to local storage | OS, EFI, clone, and cloud-init storage default to ceph-vm |
| Automation script safety | Could fail if user exists | User creation made safer/idempotent |
9. Expected final Proxmox result
After terraform apply, the Proxmox UI should show:
pve0
  1212 gpu

pve1
  1210 ctrl

pve2
  1211 cmp
All three should be running and using ceph-vm for their disks.
10. Validation commands
Check VM placement and state:
pvesh get /cluster/resources --type vm | egrep '1210|1211|1212'Check storage:
pvesm list ceph-vm | egrep '1210|1211|1212'
pvesm list local-lvm | egrep '1210|1211|1212'
Check SSH:
ssh sont@192.168.1.51 hostname
ssh sont@192.168.1.52 hostname
ssh sont@192.168.1.53 hostname
Check sudo:
ssh sont@192.168.1.51 'sudo whoami'
ssh sont@192.168.1.52 'sudo whoami'
ssh sont@192.168.1.53 'sudo whoami'
Check QEMU guest agent:
ssh root@pve1 'qm agent 1210 ping'
ssh root@pve2 'qm agent 1211 ping'
ssh root@pve0 'qm agent 1212 ping'
Check nested KVM:
ssh sont@192.168.1.52 "egrep -c '(vmx|svm)' /proc/cpuinfo"
ssh sont@192.168.1.53 "egrep -c '(vmx|svm)' /proc/cpuinfo"
11. Next step after successful VM creation
Once these three VMs are healthy, continue with the OpenStack/Kolla-Ansible preparation steps:
- Add
/etc/hostsentries. - Confirm SSH access from the deployment VM.
- Install Docker and Python dependencies on all OpenStack nodes.
- Install Kolla-Ansible on the deployment VM.
- Generate and edit Kolla inventory.
- Run
kolla-ansible bootstrap-servers. - Run
kolla-ansible prechecks. - Run
kolla-ansible deploy.
Overview
You now have two playbooks covering the next OpenStack preparation stages:
prepare_openstack_vms.yml
    └── Phase 7.2 - Prepare OS
    └── Phase 7.3 - Install Docker

build_deployment_vm.yml
    └── Phase 7.4 - Build Kolla-Ansible deployment node
Your inventory defines the three OpenStack VMs as:
ctrl  192.168.1.51  control
cmp   192.168.1.52  compute
gpu   192.168.1.53  compute-gpu
and uses sont as the Ansible SSH user with privilege escalation enabled.
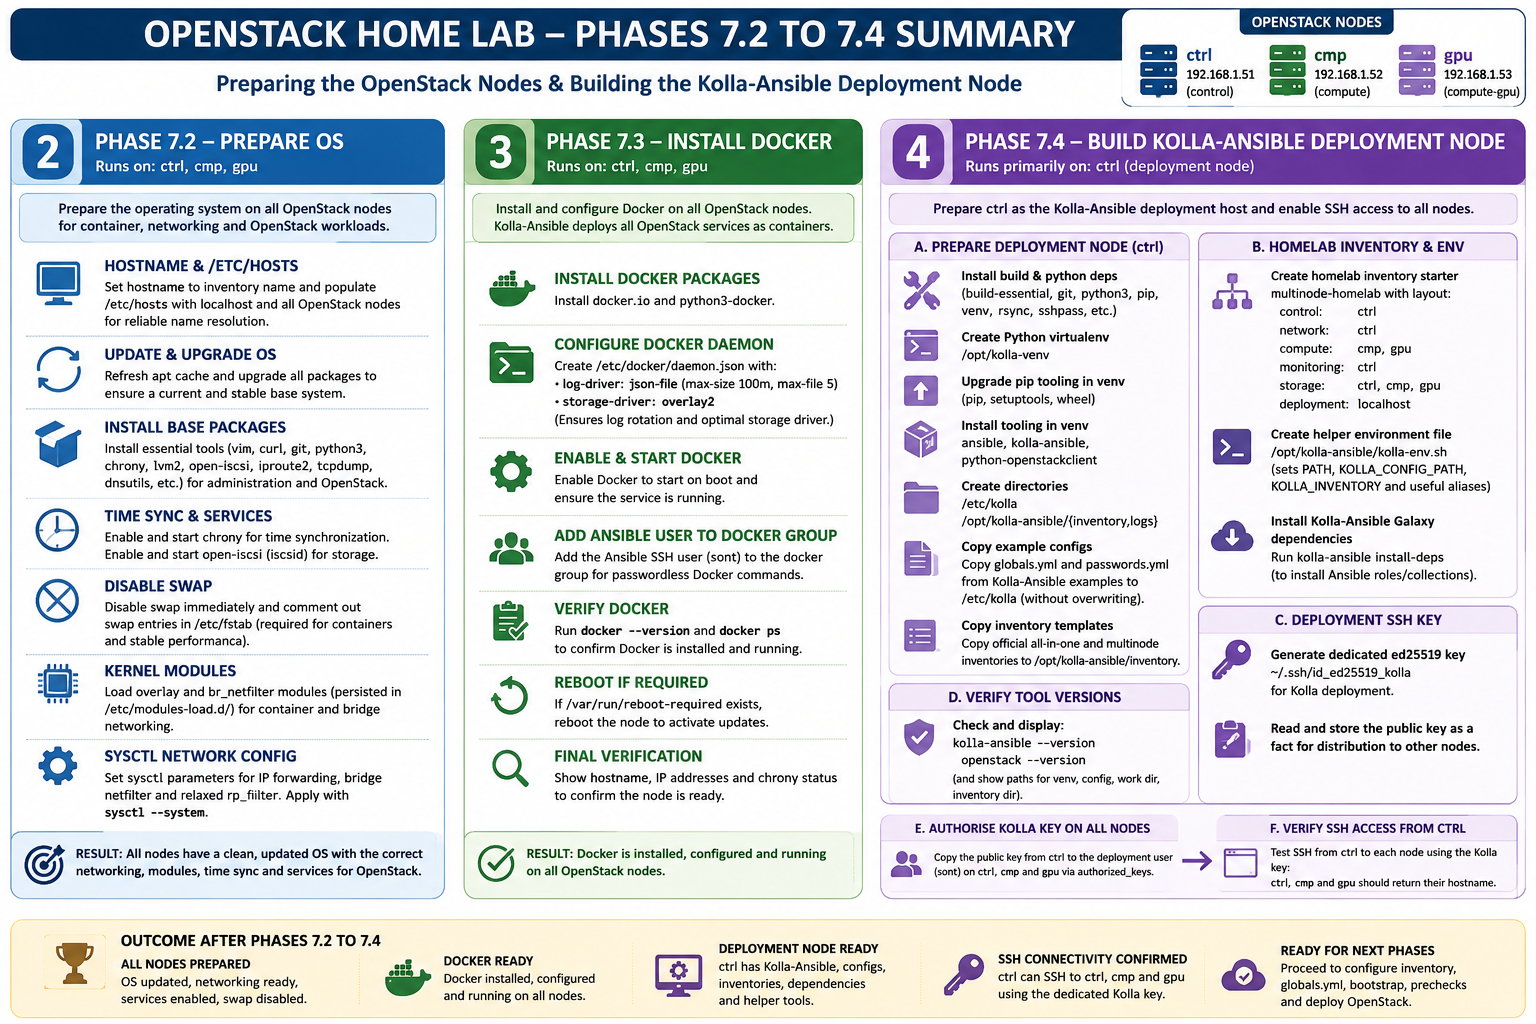
Phase 7.2 — Prepare the OpenStack VMs
This section runs against:
hosts: openstackSo it applies to all three OpenStack VMs:
ctrl
cmp
gpu
The playbook is preparing the operating system so that the nodes are suitable for Kolla-Ansible, Docker containers, OpenStack services, and later Nova/Cinder/Neutron workloads.
1. Defines the OpenStack host map
The playbook defines this internal map:
openstack_hosts:
  ctrl:
    ip: "192.168.1.51"
    fqdn: "ctrl.lab.local"
    role: "control"
  cmp:
    ip: "192.168.1.52"
    fqdn: "cmp.lab.local"
    role: "compute"
  gpu:
    ip: "192.168.1.53"
    fqdn: "gpu.lab.local"
    role: "compute-gpu"
This lets the playbook understand the expected hostname, IP, FQDN, and role of each VM.
It also has a safety check:
- name: Validate host exists in openstack_hosts mapThat means if you accidentally run the play against a host not listed in the map, it fails early instead of modifying the wrong machine.
This is good practice.
2. Sets the system hostname
For each VM, it sets the Linux hostname to match the Ansible inventory name:
ctrl
cmp
gpu
So:
hostname:
  name: "{{ inventory_hostname }}"
This is important because OpenStack/Kolla-Ansible depends heavily on predictable hostnames. If hostname resolution is wrong, later steps such as RabbitMQ clustering, MariaDB, Nova compute registration, and container service discovery can fail in confusing ways.
3. Updates /etc/hosts
The playbook manages two sections in /etc/hosts.
First, it sets localhost identity:
127.0.0.1 localhost
127.0.1.1 ctrl ctrl.lab.local
or equivalent for each node.
Second, it adds all three OpenStack nodes:
192.168.1.51 ctrl ctrl.lab.local
192.168.1.52 cmp cmp.lab.local
192.168.1.53 gpu gpu.lab.local
This means every node can resolve every other node even if DNS is not yet configured.
That matters because Kolla-Ansible and OpenStack services expect reliable name resolution between:
ctrl <-> cmp
ctrl <-> gpu
cmp  <-> gpu
4. Updates and upgrades the OS
The playbook refreshes the apt cache:
apt:
  update_cache: true
  cache_valid_time: 3600
Then performs a full distribution upgrade:
apt:
  upgrade: dist
  autoremove: true
  autoclean: true
This brings the base Ubuntu VMs up to date before installing Docker and Kolla dependencies.
That is especially important before deploying OpenStack, because you want predictable package versions, current kernel fixes, and clean dependency resolution before containers are deployed.
5. Installs base operating system packages
The playbook installs a useful base package set:
vim
curl
wget
git
jq
htop
tmux
python3
python3-pip
python3-venv
python3-setuptools
python3-dev
chrony
net-tools
bridge-utils
lvm2
ca-certificates
gnupg
apt-transport-https
software-properties-common
rsync
unzip
iproute2
iputils-ping
traceroute
dnsutils
tcpdump
open-iscsi
These cover several categories:
Administration:      vim, htop, tmux, jq
Python/Ansible:      python3, pip, venv, setuptools, dev headers
Networking:          iproute2, ping, traceroute, dnsutils, tcpdump
Storage:             lvm2, open-iscsi
Package/security:    ca-certificates, gnupg, apt-transport-https
The important OpenStack-related packages here are:
python3
python3-pip
python3-venv
python3-dev
lvm2
open-iscsi
bridge-utils
tcpdump
open-iscsi is particularly useful later for block storage integration and general cloud storage testing.
6. Enables time synchronisation with Chrony
The playbook enables and starts chrony:
systemd:
  name: chrony
  enabled: true
  state: started
This is critical.
OpenStack services are sensitive to clock drift. Keystone tokens, certificates, logs, distributed service coordination, RabbitMQ behaviour, and database timestamps all depend on consistent time.
Bad time sync can cause errors that look like authentication or API failures.
7. Enables open-iscsi
The playbook enables and starts:
iscsidThis supports iSCSI-based block storage usage. Even if your primary storage will be Ceph RBD, enabling iSCSI now is sensible because OpenStack/Cinder labs often test multiple storage backends.
The task uses:
ignore_errors: trueSo if the service name or package behaviour differs slightly, it does not stop the entire run.
8. Disables swap
The playbook disables swap immediately:
swapoff -aThen comments out swap entries in /etc/fstab.
This matters for two reasons:
- Kubernetes later expects swap to be disabled unless specifically configured otherwise.
- OpenStack compute/container workloads behave more predictably without the kernel swapping under memory pressure.
For your combined OpenStack/Kubernetes/Slurm homelab, disabling swap is the right default.
9. Loads kernel modules for container and bridge networking
The playbook creates:
/etc/modules-load.d/openstack-homelab.confwith:
overlay
br_netfilter
Then it immediately loads both modules.
overlay is needed for Docker’s overlay2 storage driver.
br_netfilter allows iptables/nftables rules to inspect traffic crossing Linux bridges. That is important for container networking and Kubernetes-style bridge traffic handling.
10. Applies sysctl settings for OpenStack/container networking
The playbook writes:
/etc/sysctl.d/99-openstack-homelab.confwith:
net.ipv4.ip_forward = 1
net.bridge.bridge-nf-call-iptables = 1
net.bridge.bridge-nf-call-ip6tables = 1
net.ipv4.conf.all.rp_filter = 0
net.ipv4.conf.default.rp_filter = 0
Then it runs:
sysctl --systemThese settings prepare the nodes for:
routing
bridge traffic filtering
container networking
OpenStack Neutron traffic
overlay networking
future Kubernetes networking
The rp_filter = 0 settings are especially relevant for multi-interface, overlay, and routed cloud networking. Strict reverse-path filtering can break asymmetric routing and overlay traffic.
Phase 7.3 — Install Docker
Kolla-Ansible deploys OpenStack services as containers, so Docker must be installed and running on all OpenStack nodes.
This section also runs against:
ctrl
cmp
gpu
The Docker section installs Docker, configures daemon settings, enables the service, verifies it, and reboots if the OS upgrade requires it.
1. Installs Docker packages
The playbook installs:
docker.io
python3-docker
docker.io provides the Docker engine.
python3-docker allows Ansible and Python tooling to interact with Docker if needed.
2. Creates Docker systemd override directory
It creates:
/etc/systemd/system/docker.service.dThis is not yet populated with an override file, but it prepares the node for future Docker service overrides.
That is useful if later you need to set proxy settings, custom daemon startup flags, or systemd limits.
3. Configures Docker daemon
The playbook creates:
/etc/docker/daemon.jsonwith:
{
  "log-driver": "json-file",
  "log-opts": {
    "max-size": "100m",
    "max-file": "5"
  },
  "storage-driver": "overlay2"
}
This does two important things.
First, it prevents Docker container logs from growing without bounds:
max-size = 100m
max-file = 5
So each container can use up to roughly 500 MB of JSON logs before rotation.
Second, it forces Docker to use:
overlay2which is the standard storage driver for modern Linux container hosts.
The task notifies the Docker restart handler, so Docker restarts only if the config changes.
4. Enables and starts Docker
The playbook ensures Docker is:
enabled at boot
currently running
using systemd.
This means the node is ready for Kolla-Ansible to deploy OpenStack service containers.
5. Adds Ansible user to the Docker group
The playbook adds the Ansible SSH user to:
dockerIn your inventory this user is:
sontThis allows sont to run Docker commands without needing sudo, although Kolla-Ansible itself will still commonly use privilege escalation for deployment tasks.
6. Verifies Docker
It runs:
docker --version
docker ps
Then prints the Docker version.
This confirms:
Docker binary is installed
Docker daemon is running
Current Ansible privilege context can query Docker
7. Reboots if required
The playbook checks:
/var/run/reboot-requiredIf present, it reboots the node.
This is important because the earlier full OS upgrade may have installed:
new kernel
system libraries
security updates
container runtime dependencies
You want those active before Kolla-Ansible deploys OpenStack containers.
8. Performs final verification
At the end, the playbook collects:
hostnamectl --static
ip -br addr
chronyc tracking
and prints a final summary containing:
Host
Role
Hostname
Docker version
IP summary
Chrony tracking
That gives you a clear post-run confirmation for each VM.
Phase 7.4 — Build the Kolla-Ansible Deployment Node
Phase 7.4 is handled by build_deployment_vm.yml.
This playbook runs primarily on:
hosts: controlIn your inventory, that means:
ctrlThe purpose is to turn ctrl into the Kolla-Ansible deployment host. In your topology, ctrl becomes:
OpenStack control node
network node
monitoring node
Kolla-Ansible deployment node
The playbook explicitly asserts that it is running only on ctrl, then installs the tools and files needed to run Kolla-Ansible.
1. Defines Kolla paths
It sets these important paths:
Kolla virtualenv:     /opt/kolla-venv
Kolla config:         /etc/kolla
Kolla work dir:       /opt/kolla-ansible
Kolla inventory dir:  /opt/kolla-ansible/inventory
Kolla SSH key:        /home/sont/.ssh/id_ed25519_kolla
This gives you a clean separation:
/opt/kolla-venv       Python/Kolla tooling
/etc/kolla            Kolla configuration
/opt/kolla-ansible    working directory and inventories
/home/sont/.ssh       deployment SSH identity
That is a sensible layout for a homelab because it avoids scattering Kolla files across the user’s home directory.
2. Installs deployment-node packages
It installs build and Python dependencies such as:
build-essential
gcc
libffi-dev
libssl-dev
python3
python3-dev
python3-pip
python3-venv
python3-setuptools
python3-wheel
git
rsync
sshpass
These are needed because Kolla-Ansible and the OpenStack client are Python packages. Some dependencies may need compilation or development headers.
3. Creates a Python virtual environment
It creates:
/opt/kolla-venvusing:
python3 -m venv /opt/kolla-venvThis isolates Kolla-Ansible and OpenStack client dependencies from the operating system Python packages.
That is the right approach. It prevents system package conflicts and makes the deployment tooling easier to rebuild.
4. Upgrades pip tooling inside the virtualenv
It upgrades:
pip
setuptools
wheel
inside /opt/kolla-venv.
That reduces Python packaging problems when installing Kolla-Ansible, OpenStack client libraries, and their dependencies.
5. Installs Ansible, Kolla-Ansible and OpenStack client
The current uploaded build_deployment_vm.yml installs:
ansible-core
ansible
kolla-ansible
python-openstackclient
inside /opt/kolla-venv.
That gives ctrl the core tooling needed for later phases:
kolla-ansible
openstack
ansible
ansible-playbook
ansible-galaxy
One important note: as seen from your earlier error, this section may need version pinning depending on the Kolla-Ansible version installed. The uploaded file still shows unpinned ansible-core and ansible, so it can accidentally install an incompatible Ansible version.
6. Creates /etc/kolla
The playbook creates:
/etc/kollaowned by the deployment user.
This directory will hold:
globals.yml
passwords.yml
future service config overrides
This becomes the main Kolla-Ansible configuration directory.
7. Creates Kolla working directories
It creates:
/opt/kolla-ansible
/opt/kolla-ansible/inventory
/opt/kolla-ansible/logs
This gives you a consistent place to store:
Kolla inventory files
deployment helper scripts
logs
homelab starter inventory
8. Finds Kolla example configuration files
Instead of assuming a fixed install path, the playbook searches for:
globals.ymlunder:
/opt/kolla-venv/share
/usr/local/share
/usr/share
If it cannot find globals.yml, it fails with a debugging command.
This is an improvement over the earlier cp ... * approach because Python virtualenv installs can place Kolla example files in slightly different locations depending on package/version.
9. Copies globals.yml and passwords.yml
Once it finds the example config directory, it copies:
globals.yml
passwords.yml
into:
/etc/kollausing remote_src: true.
It uses:
force: falseThat means it does not overwrite existing files.
That is good because once you start editing /etc/kolla/globals.yml, rerunning the playbook will not destroy your changes.
10. Finds Kolla inventory templates
The playbook searches for the official Kolla:
multinodeinventory file.
Then it sets the source inventory directory and copies:
all-in-one
multinode
to:
/opt/kolla-ansible/inventoryThese are the official Kolla inventory templates.
You will later edit multinode for Phase 7.5.
11. Creates a homelab starter Kolla inventory
The playbook creates:
/opt/kolla-ansible/inventory/multinode-homelabwith this simplified topology:
[control]
ctrl

[network]
ctrl

[compute]
cmp
gpu

[monitoring]
ctrl

[storage]
ctrl
cmp
gpu

[deployment]
localhost
This file is not yet the final production Kolla inventory. It is a starter reference for your homelab layout.
The key mapping is:
ctrl = control + network + monitoring
cmp  = compute
gpu  = compute, later GPU passthrough
This matches your intended OpenStack topology.
12. Creates a Kolla environment helper file
It creates:
/opt/kolla-ansible/kolla-env.shcontaining:
export PATH="/opt/kolla-venv/bin:$PATH"
export KOLLA_CONFIG_PATH="/etc/kolla"
export KOLLA_INVENTORY="/opt/kolla-ansible/inventory/multinode"

alias ka="/opt/kolla-venv/bin/kolla-ansible"
alias osc="/opt/kolla-venv/bin/openstack"
This is useful because after logging into ctrl, you can run:
source /opt/kolla-ansible/kolla-env.shThen use:
ka
osc
instead of typing the full paths.
13. Installs Kolla-Ansible Galaxy dependencies
The playbook runs:
/opt/kolla-venv/bin/kolla-ansible install-depsThis installs the Ansible roles and collections required by Kolla-Ansible.
This is the task you have been troubleshooting.
Conceptually, it prepares the deployment node so that later commands can run:
kolla-ansible bootstrap-servers
kolla-ansible prechecks
kolla-ansible deploy
However, your current version has hit a dependency issue around the stable/2024.2 collection branch. So as written, this stage is intended to complete 7.4, but in your actual run it needs the version/requirements patch we discussed earlier.
14. Generates a dedicated Kolla SSH key
The playbook creates:
/home/sont/.ssh/id_ed25519_kollawith comment:
kolla-deploy@ctrlThis gives ctrl its own deployment SSH identity.
That is better than reusing your personal SSH key because this key is specifically for:
ctrl -> ctrl
ctrl -> cmp
ctrl -> gpu
Kolla-Ansible needs this because it will SSH from the deployment node to all OpenStack nodes.
15. Reads and stores the public key
It reads:
/home/sont/.ssh/id_ed25519_kolla.pubusing slurp, decodes it, and stores it as:
kolla_deploy_public_key_textThat lets the later play distribute the key to every OpenStack node.
16. Verifies tool versions
The playbook checks:
/opt/kolla-venv/bin/kolla-ansible --version
/opt/kolla-venv/bin/openstack --version
Then prints a deployment node summary showing:
Deployment node
Kolla venv path
Kolla config path
Kolla work dir
Kolla inventory dir
Kolla-Ansible version
OpenStack client version
Phase 7.4 — Authorise SSH from ctrl to all OpenStack nodes
The second play in build_deployment_vm.yml runs against:
hosts: openstackSo it applies to:
ctrl
cmp
gpu
It installs the public key generated on ctrl into each node’s authorized_keys.
That means the deployment user on ctrl can SSH to all OpenStack nodes using:
/home/sont/.ssh/id_ed25519_kollaThis is necessary because Kolla-Ansible runs from the deployment node and performs remote actions across all nodes.
Phase 7.4 — Verify SSH from ctrl
The final play runs from:
hosts: controlSo it runs on ctrl.
It executes:
ssh -i /home/sont/.ssh/id_ed25519_kolla \
  -o BatchMode=yes \
  -o StrictHostKeyChecking=accept-new \
  sont@192.168.1.51 hostname

ssh -i /home/sont/.ssh/id_ed25519_kolla \
  -o BatchMode=yes \
  -o StrictHostKeyChecking=accept-new \
  sont@192.168.1.52 hostname

ssh -i /home/sont/.ssh/id_ed25519_kolla \
  -o BatchMode=yes \
  -o StrictHostKeyChecking=accept-new \
  sont@192.168.1.53 hostname
Expected output:
192.168.1.51 returned hostname ctrl
192.168.1.52 returned hostname cmp
192.168.1.53 returned hostname gpu
This proves that Kolla-Ansible will be able to reach all nodes from the deployment node.
What is complete after these playbooks?
Once both playbooks complete successfully, you should have:
Phase 7.2 complete:
  ctrl/cmp/gpu hostnames set
  /etc/hosts configured
  OS updated
  base packages installed
  chrony running
  open-iscsi enabled
  swap disabled
  kernel modules loaded
  sysctl networking prepared

Phase 7.3 complete:
  Docker installed
  Docker daemon configured
  Docker enabled and running
  Docker log rotation configured
  Docker overlay2 storage configured
  Ansible user added to docker group
  Docker verified

Phase 7.4 complete:
  ctrl prepared as Kolla deployment node
  /opt/kolla-venv created
  kolla-ansible installed
  python-openstackclient installed
  /etc/kolla created
  globals.yml and passwords.yml copied
  official Kolla inventories copied
  homelab inventory starter created
  kolla-env.sh helper created
  Galaxy dependencies installed
  dedicated Kolla SSH key generated
  ctrl can SSH to ctrl/cmp/gpu
What these playbooks do not do yet
They do not yet perform Phase 7.5 onwards.
Specifically, they do not yet:
Configure the final Kolla multinode inventory
Configure /etc/kolla/globals.yml
Generate or customise OpenStack passwords
Configure network_interface/api_interface
Configure Neutron provider/tenant networking
Configure Ceph integration
Run kolla-ansible bootstrap-servers
Run kolla-ansible prechecks
Run kolla-ansible deploy
Run kolla-ansible post-deploy
Create OpenStack images, networks, routers, flavors, or VMs
So the playbooks prepare the foundation, but they do not deploy OpenStack yet.
Important correction before you rely on Phase 7.4
Your uploaded build_deployment_vm.yml still contains the unpinned package install:
ansible-core
ansible
kolla-ansible
python-openstackclient
and still runs:
kolla-ansible install-depswithout the compatibility patch for the stable/2024.2 collection issue.
So the intent of the playbook is correct, but for your environment it needs the fixes we discussed:
Pin compatible Ansible versions
Run install-deps with the venv PATH
Patch requirements.yml if it still references stable/2024.2
After that, Phase 7.4 should complete cleanly and you will be ready for:
Phase 7.5 – Configure Kolla multinode inventory
Phase 7.6 – Configure globals.yml
Phase 7.7 – Bootstrap servers
Phase 7.8 – Run prechecks
Phase 7.9 – Deploy OpenStack