At this point your homelab has become a real cloud.
You have built:
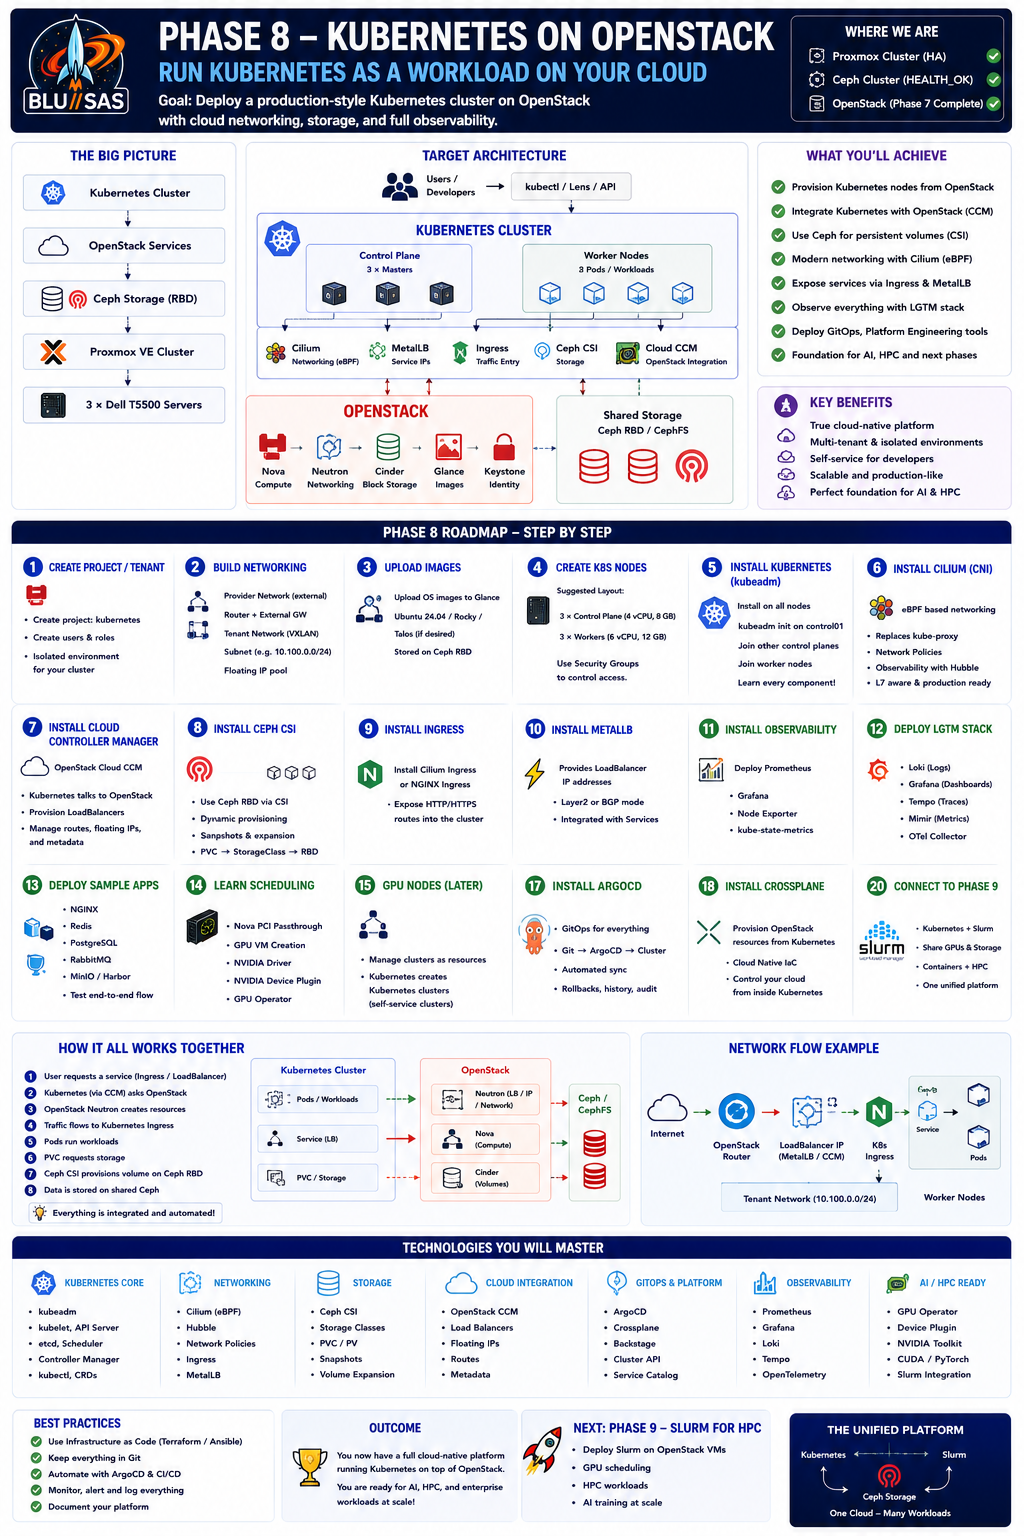
Hardware
    ↓
Proxmox
    ↓
Ceph
    ↓
OpenStack
Now you’re going to deploy Kubernetes as a tenant workload running on OpenStack.
This is exactly how many organisations operate production Kubernetes clusters.
The Goal
Build this stack:
                      Users
                        │
                 kubectl / Lens
                        │
                 Kubernetes API
                        │
        ┌────────────────────────────────┐
        │        Kubernetes Cluster      │
        │                                │
        │ Control Plane                  │
        │ Worker Nodes                   │
        │ Cilium                         │
        │ MetalLB                        │
        │ Ingress                        │
        │ Longhorn / Ceph CSI            │
        └────────────────────────────────┘
                        │
                  OpenStack APIs
                        │
           Nova  Neutron  Cinder  Glance
                        │
                     Ceph RBD
                        │
                  Proxmox Cluster
                        │
                 Dell T5500 Servers
Why Kubernetes AFTER OpenStack?
Many people install Kubernetes directly onto bare metal.
That teaches Kubernetes.
Installing Kubernetes on OpenStack teaches:
- Cloud architecture
- Infrastructure abstraction
- VM orchestration
- Persistent storage
- Cloud networking
- Tenant isolation
It also mirrors enterprise deployments.
Learning Objectives
By the end of Phase 8 you should understand:
- Kubernetes architecture
- How OpenStack provisions Kubernetes nodes
- Kubernetes networking
- Cloud storage
- CSI drivers
- CNI plugins
- Load balancing
- Ingress
- Cloud Controller Manager
- Cluster API
- Kubernetes autoscaling
Step 1 — Create a Kubernetes Project in OpenStack
Create a dedicated tenant/project:
Project:
kubernetes
Create:
- Users
- Networks
- Routers
- Security Groups
- Floating IP Pool
Treat it as an isolated customer environment.
Step 2 — Build Networking
Inside OpenStack create:
Provider Network
↓
Router
↓
Tenant Network
↓
Subnet
↓
Floating IPs
Example:
External

192.168.1.x
↓
Router
↓
10.100.0.0/24
↓
Kubernetes Nodes
Step 3 — Upload Kubernetes Images
Create cloud images:
Ubuntu 24.04
Rocky Linux
or
Talos Linux
Store them inside:
Glance
↓
Ceph RBD
Step 4 — Build Kubernetes VMs
Suggested layout:
| VM | vCPU | RAM |
|---|---|---|
| k8s-control01 | 4 | 8 GB |
| k8s-control02 | 4 | 8 GB |
| k8s-control03 | 4 | 8 GB |
| worker01 | 6 | 12 GB |
| worker02 | 6 | 12 GB |
| worker03 | 6 | 12 GB |
If resources are tight:
1 Control
3 Workers
is perfectly acceptable.
Step 5 — Install Kubernetes
I recommend:
kubeadmWhy?
You’ll understand:
- certificates
- kubeadm init
- join tokens
- etcd
- kubelet
- kube-proxy
instead of hiding them behind automation.
Kubernetes Architecture
             kube-apiserver
                 │
 Scheduler   Controller Manager
                 │
               etcd

──────────────────────────────────

 kubelet
 kube-proxy
 containerd
 Worker Nodes
Learn every component.
Step 6 — Install Cilium
Skip Flannel.
Skip Weave.
Install:
CiliumBecause:
- eBPF
- production ready
- AI cloud favourite
- replaces kube-proxy
Learn:
- Hubble
- Network Policies
- L7 filtering
- Service Mesh
Step 7 — Install Cloud Controller Manager
This is where OpenStack becomes interesting.
Install:
OpenStack Cloud Controller ManagerIt allows Kubernetes to request:
- Load Balancers
- Floating IPs
- Routes
- Metadata
directly from OpenStack.
Now Kubernetes understands:
Nova
Neutron
Cinder
Step 8 — Install Ceph CSI
Instead of Longhorn
Use:
Ceph CSIbecause OpenStack already uses Ceph.
Architecture
Pod
↓
PVC
↓
StorageClass
↓
Ceph CSI
↓
Ceph RBD
Learn:
- Storage Classes
- Dynamic Provisioning
- Volume Expansion
- Snapshots
Step 9 — Install Ingress
Install
NGINX Ingress
or
Cilium Ingress
Personally I’d use:
Cilium Ingressbecause:
- fewer moving parts
- eBPF
- integrates well
Step 10 — Install MetalLB
Although OpenStack already provides networking
MetalLB teaches:
- Layer 2
- BGP
- Service exposure
You’ll understand how LoadBalancer services actually work.
Step 11 — Install Metrics
Deploy:
- Prometheus
- Grafana
- Node Exporter
- kube-state-metrics
Step 12 — Install LGTM
You already know this.
Deploy:
Grafana
↓
Mimir
↓
Loki
↓
Tempo
↓
OpenTelemetry Collector
Now observe:
- Kubernetes
- OpenStack
- Ceph
in one place.
Step 13 — Deploy Sample Applications
Deploy:
- NGINX
- Redis
- PostgreSQL
- RabbitMQ
- MinIO
- Harbor
Step 14 — Learn Kubernetes Scheduling
Understand:
- Node Selectors
- Affinity
- Anti-affinity
- Taints
- Tolerations
- Topology Spread
- Priority Classes
- Pod Disruption Budgets
Step 15 — GPU Nodes
Later
Configure:
Nova
↓
PCI Passthrough
↓
GPU VM
↓
NVIDIA Driver
↓
GPU Operator
↓
Kubernetes
Deploy
NVIDIA Device Plugin
Run:
- PyTorch
- TensorFlow
- CUDA Samples
Step 16 — Install Cluster API
Cluster API lets Kubernetes build Kubernetes.
Architecture
Management Cluster
↓
Cluster API
↓
OpenStack
↓
Creates
↓
Worker Clusters
This is becoming common in enterprise environments.
Step 17 — Install ArgoCD
Learn GitOps.
Git
↓
ArgoCD
↓
Kubernetes
Everything becomes declarative.
Step 18 — Install Crossplane
This is where Platform Engineering begins.
Crossplane can provision:
- OpenStack resources
- Kubernetes resources
- Cloud resources
from Kubernetes itself.
Step 19 — Build an Internal Developer Platform
Deploy:
- Backstage
- ArgoCD
- Crossplane
- Harbor
Developers should be able to click:
Create Kubernetes Cluster
without touching OpenStack.
Step 20 — Connect to Phase 9 (Slurm)
Eventually your Kubernetes cluster becomes another workload platform alongside HPC.
              OpenStack
        ┌────────┴─────────┐
   Kubernetes            Slurm
        │                  │
   Containers           HPC Jobs
        │                  │
        Shared  Ceph  Storage
Both use:
- Nova
- Neutron
- Ceph
- GPU-enabled VMs
Technologies to Learn in Phase 8
| Category | Technologies |
|---|---|
| Kubernetes | kubeadm, kubelet, etcd, API Server |
| Networking | Cilium, Hubble, eBPF, Cilium Ingress |
| Storage | Ceph CSI, Storage Classes, PVCs |
| Cloud | OpenStack Cloud Controller Manager |
| Security | RBAC, Network Policies, Pod Security |
| GitOps | ArgoCD |
| Platform Engineering | Crossplane, Backstage |
| Observability | Prometheus, Grafana, Mimir, Loki, Tempo, OpenTelemetry |
| AI | NVIDIA GPU Operator, Device Plugin |
| Cluster Management | Cluster API |
Final Target Architecture
By the end of Phase 8, your homelab should look like this:
                  Users
                     │
        kubectl / Horizon / Grafana
                     │
      ┌──────────────┴──────────────┐
      │                             │
 Kubernetes Platform           OpenStack Control Plane
 (Cilium, ArgoCD, CSI)      (Nova, Neutron, Keystone)
      │                             │
      └──────────────┬──────────────┘
                     │
                 Ceph Storage
             (RBD, CephFS, RGW)
                     │
              Proxmox VE Cluster
                     │
          3 × Dell T5500 Workstations
This phase is where your homelab evolves from a cloud infrastructure into a cloud-native platform. You’ll not only understand how Kubernetes works, but how it integrates with OpenStack, Ceph, and later Slurm to support containerised applications, AI training, and HPC workloads in a realistic enterprise environment.