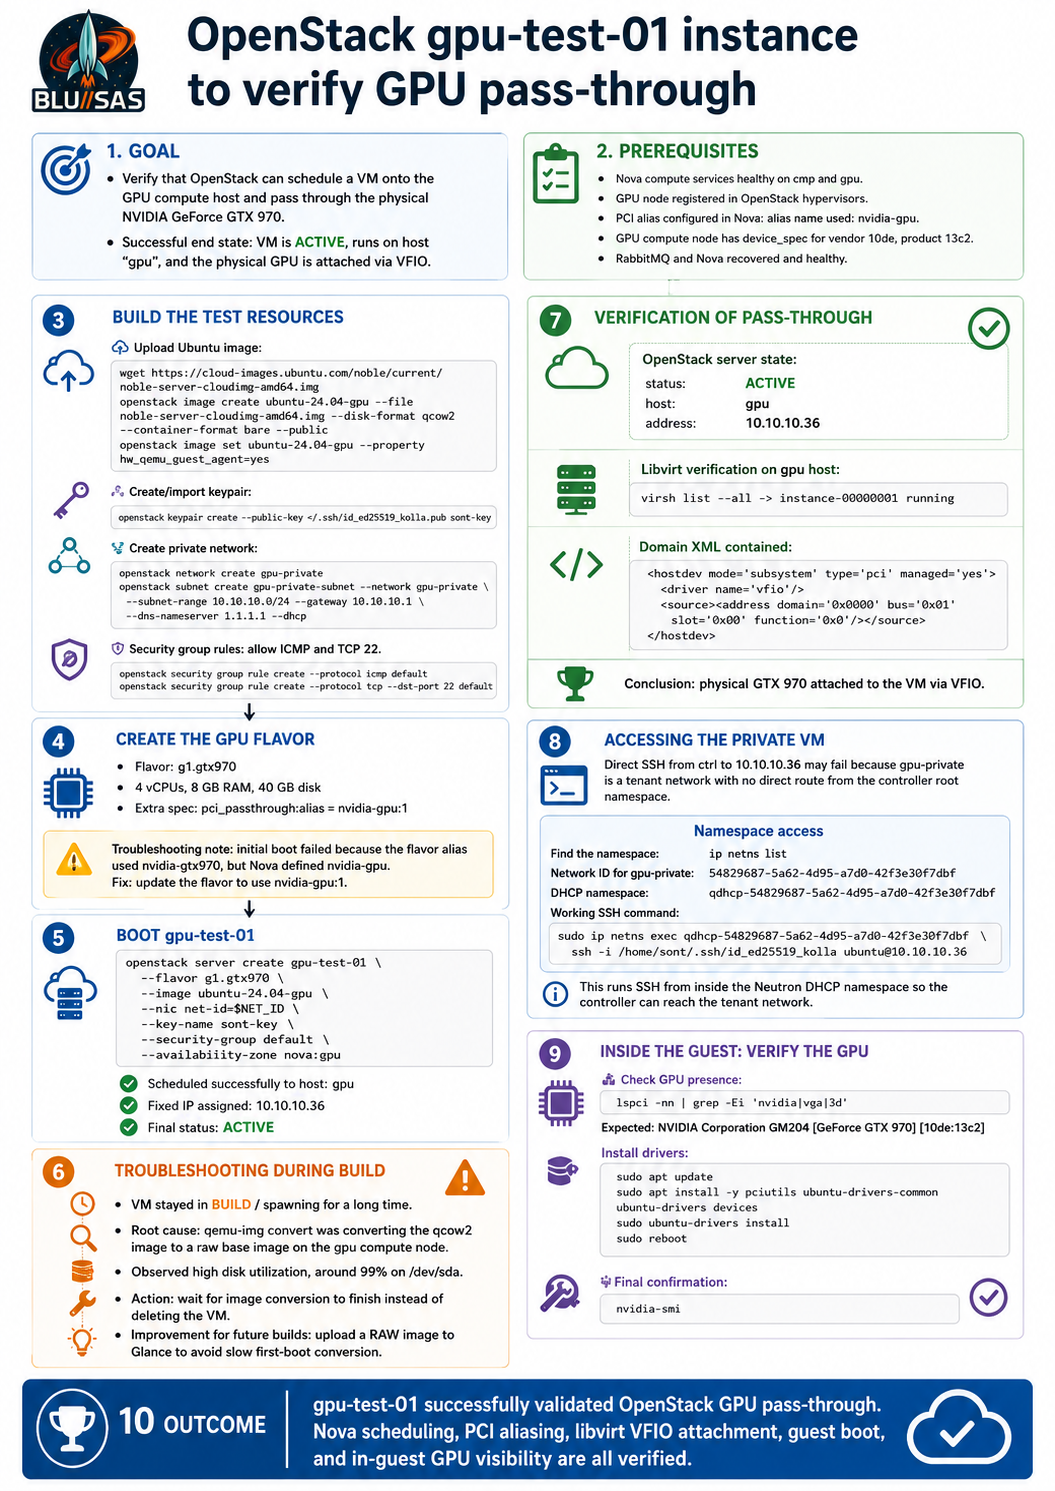
GPU passthrough verification summary: gpu-test-01
You successfully proved that OpenStack Nova can schedule a VM to the gpu compute host and pass through the NVIDIA GTX 970 as a PCI device.
The final working VM was:
gpu-test-01with:
Flavor: g1.gtx970
Image: ubuntu-24.04-gpu
Network: gpu-private
Fixed IP: 10.10.10.36
Host: gpu
Status: ACTIVE
The key successful OpenStack state was:
OS-EXT-SRV-ATTR:host  gpu
OS-EXT-STS:vm_state   active
OS-EXT-STS:task_state None
addresses             gpu-private=10.10.10.36
status                ACTIVE
1. Creating the GPU test VM
You first created the server using the GPU-enabled flavor:
NET_ID="$(openstack network show gpu-private -f value -c id)"

openstack server create gpu-test-01 \
  --flavor g1.gtx970 \
  --image ubuntu-24.04-gpu \
  --nic net-id="$NET_ID" \
  --key-name sont-key \
  --security-group default \
  --availability-zone nova:gpu
The important parts of this command are:
--flavor g1.gtx970This flavor contains the PCI passthrough request:
pci_passthrough:alias = nvidia-gpu:1That tells Nova:
This VM requires one PCI device matching the alias nvidia-gpu.The other important part is:
--availability-zone nova:gpuThat forces scheduling to the gpu compute node, which is the host that owns the physical GTX 970.
2. Initial alias problem
The first failure was:
PCI alias nvidia-gtx970 is not definedThe cause was a mismatch between the flavor and Nova config.
The flavor originally requested:
nvidia-gtx970:1but Nova had defined:
nvidia-gpuThe fix was to make the flavor use the same alias that Nova knew about:
openstack flavor unset g1.gtx970 --property "pci_passthrough:alias"

openstack flavor set g1.gtx970 \
  --property "pci_passthrough:alias"="nvidia-gpu:1"
After that, Nova accepted the request and scheduled the instance onto the gpu host.
3. Build delay during image conversion
The VM sat in:
status: BUILD
task_state: spawning
vm_state: building
for a long time.
This was not a GPU problem. The logs showed Nova had reached:
Claim successful on node gpu
Creating image(s)
The process check showed:
qemu-img convert -t none -O raw -f qcow2 \
  /var/lib/nova/instances/_base/<image>.part \
  /var/lib/nova/instances/_base/<image>.converted
So Nova was converting the Glance qcow2 image into a raw base image on the gpu node.
Disk I/O showed the disk was saturated:
sda %util: ~99%
write throughput: around 1 MB/s
That explained the slow build. The correct action was to wait, not delete the VM. Once qemu-img convert finished, the VM became ACTIVE.
For future builds, using a raw image in Glance would avoid this slow first-boot conversion:
qemu-img convert -f qcow2 -O raw noble-server-cloudimg-amd64.img noble-server-cloudimg-amd64.raw

openstack image create ubuntu-24.04-gpu-raw \
  --file noble-server-cloudimg-amd64.raw \
  --disk-format raw \
  --container-format bare \
  --public
4. Verifying the VM booted correctly
The console log proved the VM booted and cloud-init finished:
Ubuntu 24.04.4 LTS gpu-test-01 ttyS0
cloud-init finished
Authorized keys from /home/ubuntu/.ssh/authorized_keys for user ubuntu
That confirmed:
Ubuntu booted successfully
cloud-init completed
SSH key was injected correctly
The ubuntu user has your key
So SSH failure was not caused by the guest OS or missing key.
5. Verifying the GPU was attached by libvirt
You checked the running libvirt domain:
ansible -i "$KOLLA_INVENTORY" gpu -m shell -a '
echo "=== libvirt domain ==="
docker exec nova_libvirt virsh list --all

echo "=== GPU hostdev in XML ==="
docker exec nova_libvirt virsh dumpxml instance-00000001 | grep -Ei "hostdev|vendor|product|0x10de|0x13c2|pci|source|address" -A10 -B5 || true
'
The domain was running:
Id   Name                State
-----------------------------------
1    instance-00000001   running
The decisive passthrough evidence was:
<hostdev mode='subsystem' type='pci' managed='yes'>
  <driver name='vfio'/>
  <source>
    <address domain='0x0000' bus='0x01' slot='0x00' function='0x0'/>
  </source>
  <alias name='hostdev0'/>
</hostdev>
That proves Nova/libvirt passed a physical PCI device into the VM using VFIO.
This means the OpenStack passthrough chain works:
Nova flavor requests PCI alias
Nova scheduler selects gpu host
nova-compute claims PCI device
libvirt starts VM
VFIO hostdev is attached to the guest
6. Security group verification
The VM’s Neutron port was:
Port ID: 21463eff-7c0b-4fa0-90af-43b876226ce8
IP:      10.10.10.36
MAC:     fa:16:3e:13:15:e2
Status:  ACTIVE
Host:    gpu
The security group attached to the port was:
0bc4d73d-f18f-4dfd-8560-0886b1ace50eYou confirmed it already had:
TCP 22 ingress from 0.0.0.0/0
ICMP ingress from 0.0.0.0/0
IPv4 egress to 0.0.0.0/0
So the SSH timeout was not caused by the security group.
7. Why direct SSH from ctrl did not work
This command timed out:
ssh -i ~/.ssh/id_ed25519_kolla ubuntu@10.10.10.36The reason is that 10.10.10.36 is on the private tenant network:
gpu-privateThe controller host root namespace does not automatically have a route into that tenant network.
So this was the problem:
ctrl root namespace ---> no direct route ---> 10.10.10.36The VM is alive, SSH is running, and the key is present. The missing piece is the correct Neutron network namespace path.
8. Finding the Neutron namespace
To find the namespaces on the controller/network node:
ip netns listFor your private network, the DHCP namespace is based on the Neutron network ID:
gpu-private network ID:
54829687-5a62-4d95-a7d0-42f3e30f7dbf
So the DHCP namespace is:
qdhcp-54829687-5a62-4d95-a7d0-42f3e30f7dbfYou can test all namespaces like this:
for ns in $(ip netns list | awk '{print $1}'); do
  echo "=== $ns ==="
  sudo ip netns exec "$ns" ping -c 2 -W 2 10.10.10.36 || true
done
Then test SSH/TCP 22:
for ns in $(ip netns list | awk '{print $1}'); do
  echo "=== $ns ==="
  sudo ip netns exec "$ns" timeout 3 bash -c '</dev/tcp/10.10.10.36/22' && echo "SSH TCP OK" || echo "SSH TCP FAIL"
done
9. Explaining the working namespace SSH command
The command is:
sudo ip netns exec qdhcp-54829687-5a62-4d95-a7d0-42f3e30f7dbf \
  ssh -i /home/sont/.ssh/id_ed25519_kolla ubuntu@10.10.10.36
Breakdown:
sudoRequired because entering Linux network namespaces needs elevated privileges.
ip netns execRuns a command inside a specific Linux network namespace.
qdhcp-54829687-5a62-4d95-a7d0-42f3e30f7dbfThis is the Neutron DHCP namespace for the gpu-private tenant network.
That namespace has an interface directly attached to the tenant network, so it can reach:
10.10.10.36where the controller root namespace could not.
ssh -i /home/sont/.ssh/id_ed25519_kolla ubuntu@10.10.10.36This runs SSH from inside the tenant network namespace using your OpenStack keypair private key.
In plain English:
Enter the Neutron DHCP namespace for gpu-private, then SSH from there into the VM using the injected keypair.This bypasses the lack of routing from the controller host root namespace.
10. Verifying GPU access inside the VM
Once logged into gpu-test-01, first install PCI tools if needed:
sudo apt update
sudo apt install -y pciutils
Then check for the NVIDIA GPU:
lspci -nn | grep -Ei 'nvidia|vga|3d'Expected result should show the GTX 970 / GM204 device:
NVIDIA Corporation GM204 [GeForce GTX 970] [10de:13c2]That proves the guest OS can see the passed-through GPU.
To check kernel binding inside the guest:
lspci -nnk | grep -Ei 'nvidia|vga|3d|kernel driver' -A3At first, before installing NVIDIA drivers, it may show no NVIDIA kernel driver or may bind to nouveau depending on the image. That is normal.
Then install the NVIDIA driver:
sudo apt install -y ubuntu-drivers-common
ubuntu-drivers devices
sudo ubuntu-drivers install
sudo reboot
After reboot, reconnect through the namespace:
sudo ip netns exec qdhcp-54829687-5a62-4d95-a7d0-42f3e30f7dbf \
  ssh -i /home/sont/.ssh/id_ed25519_kolla ubuntu@10.10.10.36
Then run:
nvidia-smiExpected result:
NVIDIA-SMI output showing the GTX 970That is the final end-to-end confirmation:
OpenStack scheduled GPU VM
libvirt attached GPU via VFIO
Ubuntu booted
guest sees NVIDIA PCI device
NVIDIA driver loads
nvidia-smi works
Final status
Your GPU passthrough setup has reached the key milestone:
OpenStack GPU passthrough is working.The only remaining operational task is choosing a cleaner long-term access model:
1. Continue using ip netns exec for lab testing
2. Add a router and floating IP network
3. Boot GPU VMs directly on a provider network
4. Add controlled routing from ctrl into gpu-private