Below is the corrected Slurm plan based on your actual current OpenStack/Kolla/GPU topology, not the earlier assumed 192.168.1.60–63 layout.
Your current base is:
Proxmox physical hosts
192.168.1.10   pve0
192.168.1.11   pve1
192.168.1.12   pve2

Kolla/OpenStack infrastructure VMs
192.168.1.50   kolla-vip
192.168.1.51   ctrl
192.168.1.52   cmp
192.168.1.53   gpu

OpenStack tenant GPU VM
10.10.10.36    gpu-test-01
The key correction is this:
Do not build Slurm directly on pve0/pve1/pve2.
Do not build Slurm directly on ctrl/cmp/gpu OpenStack infrastructure nodes.
Build Slurm as tenant VMs inside OpenStack.
Use gpu-test-01 as the first Slurm GPU compute node.
That keeps your architecture clean and realistic.
Corrected target architecture
Physical layer
────────────────────────────────────────────
pve0  192.168.1.10   Proxmox + physical GTX970
pve1  192.168.1.11   Proxmox
pve2  192.168.1.12   Proxmox


OpenStack infrastructure layer
────────────────────────────────────────────
kolla-vip  192.168.1.50   OpenStack API VIP / Horizon / Keystone endpoint
ctrl       192.168.1.51   Kolla controller services
cmp        192.168.1.52   Nova compute
gpu        192.168.1.53   Nova compute with PCI passthrough


OpenStack tenant Slurm layer
────────────────────────────────────────────
slurm-controller  10.10.10.30   slurmctld + slurmdbd + MariaDB
slurm-cpu1        10.10.10.31   slurmd
slurm-cpu2        10.10.10.32   slurmd
gpu-test-01       10.10.10.36   slurmd + NVIDIA GTX970 via Nova passthrough
I would reuse gpu-test-01 as the Slurm GPU node rather than rebuilding it immediately. You have already validated that Nova can schedule it to the GPU host, libvirt attaches the PCI hostdev, and the guest can see the GTX970. That is valuable; build on it.
Revised Slurm VM plan
Use the existing tenant network:
Tenant network: 10.10.10.0/24
Existing GPU VM: 10.10.10.36
Create three additional tenant VMs:
slurm-controller  10.10.10.30
slurm-cpu1        10.10.10.31
slurm-cpu2        10.10.10.32
gpu-test-01       10.10.10.36
So the Slurm cluster becomes:
Partition: cpu
  slurm-cpu1
  slurm-cpu2

Partition: gpu
  gpu-test-01

Controller:
  slurm-controller
Access model
Because your tenant network is private, access is still through the Neutron DHCP namespace on the OpenStack network node/controller.
You already used this pattern:
sudo ip netns exec qdhcp-54829687-5a62-4d95-a7d0-42f3e30f7dbf \
  ssh -i /home/sont/.ssh/id_ed25519_kolla ubuntu@10.10.10.36
For Slurm, use the same access pattern:
sudo ip netns exec qdhcp-54829687-5a62-4d95-a7d0-42f3e30f7dbf \
  ssh -i /home/sont/.ssh/id_ed25519_kolla ubuntu@10.10.10.30
Then from slurm-controller, SSH internally to the Slurm compute nodes:
ssh ubuntu@10.10.10.31
ssh ubuntu@10.10.10.32
ssh ubuntu@10.10.10.36
This means:
Your laptop / shell
    ↓
ctrl or network namespace
    ↓
Neutron qdhcp namespace
    ↓
10.10.10.0/24 tenant network
    ↓
Slurm VMs
Recommended hostnames and /etc/hosts
Inside all Slurm VMs, use this mapping:
sudo tee -a /etc/hosts > /dev/null <<'EOF'
10.10.10.30 slurm-controller
10.10.10.31 slurm-cpu1
10.10.10.32 slurm-cpu2
10.10.10.36 gpu-test-01 slurm-gpu1
EOF
You can either keep the GPU node hostname as gpu-test-01, or alias it as slurm-gpu1.
For learning clarity, I would do this:
OpenStack instance name: gpu-test-01
Slurm NodeName: gpu-test-01
Optional alias: slurm-gpu1
That avoids confusion between the actual Nova VM and the Slurm logical node.
Updated Slurm role assignment
slurm-controller — 10.10.10.30
Run:
munge
slurmctld
slurmdbd
mariadb
Purpose:
Slurm scheduler
Slurm accounting
Job history
Cluster control
slurm-cpu1 — 10.10.10.31
Run:
munge
slurmd
Purpose:
CPU jobs
MPI jobs
array jobs
general batch workload
slurm-cpu2 — 10.10.10.32
Run:
munge
slurmd
Purpose:
CPU jobs
MPI jobs
array jobs
general batch workload
gpu-test-01 — 10.10.10.36
Run:
munge
slurmd
NVIDIA driver
nvidia-smi
optional nvidia-dcgm-exporter
Purpose:
GPU jobs
GRES learning
Nova PCI passthrough validation
OpenStack GPU scheduling validation
Corrected architecture
┌──────────────────────────────────────────────────────────────────────┐
│                         PROXMOX CLUSTER                              │
│                                                                      │
│  pve0                  pve1                  pve2                    │
│  192.168.1.10          192.168.1.11          192.168.1.12             │
│  GTX970 physical GPU                                                  │
└───────────────┬──────────────────────────────────────────────────────┘
                │
                │ PCI passthrough / VFIO
                ▼
┌──────────────────────────────────────────────────────────────────────┐
│                  OPENSTACK INFRASTRUCTURE LAYER                      │
│                                                                      │
│  kolla-vip       ctrl              cmp              gpu               │
│  192.168.1.50    192.168.1.51      192.168.1.52     192.168.1.53      │
│                                                                      │
│  ctrl: Keystone, Glance, Horizon, Neutron, Nova API, Scheduler        │
│  cmp:  Nova compute + libvirt                                         │
│  gpu:  Nova compute + libvirt + PCI passthrough alias                 │
└───────────────┬──────────────────────────────────────────────────────┘
                │
                │ Nova schedules tenant VMs
                ▼
┌──────────────────────────────────────────────────────────────────────┐
│                    OPENSTACK TENANT NETWORK                          │
│                         10.10.10.0/24                                │
│                                                                      │
│  slurm-controller      slurm-cpu1       slurm-cpu2      gpu-test-01   │
│  10.10.10.30           10.10.10.31      10.10.10.32     10.10.10.36   │
│                                                                      │
│  slurmctld             slurmd           slurmd          slurmd        │
│  slurmdbd                                              NVIDIA GTX970 │
│  MariaDB                                               GRES gpu:1    │
└───────────────┬──────────────────────────────────────────────────────┘
                │
                │ sbatch / srun
                ▼
┌──────────────────────────────────────────────────────────────────────┐
│                          SLURM WORKLOADS                             │
│                                                                      │
│  CPU jobs       MPI jobs       Array jobs       GPU jobs via GRES     │
└──────────────────────────────────────────────────────────────────────┘
OpenStack resources to create
You already have:
gpu-test-01 10.10.10.36Now create:
slurm-controller
slurm-cpu1
slurm-cpu2
Example:
source /etc/kolla/admin-openrc.sh

openstack server create \
  --image ubuntu-24.04 \
  --flavor m1.medium \
  --network gpu-private \
  --security-group gpu-secgroup \
  --key-name id_ed25519_kolla \
  slurm-controller

openstack server create \
  --image ubuntu-24.04 \
  --flavor m1.medium \
  --network gpu-private \
  --security-group gpu-secgroup \
  --key-name id_ed25519_kolla \
  slurm-cpu1

openstack server create \
  --image ubuntu-24.04 \
  --flavor m1.medium \
  --network gpu-private \
  --security-group gpu-secgroup \
  --key-name id_ed25519_kolla \
  slurm-cpu2
If you want exact fixed IPs, create Neutron ports first:
openstack port create \
  --network gpu-private \
  --fixed-ip subnet=gpu-private-subnet,ip-address=10.10.10.30 \
  slurm-controller-port

openstack port create \
  --network gpu-private \
  --fixed-ip subnet=gpu-private-subnet,ip-address=10.10.10.31 \
  slurm-cpu1-port

openstack port create \
  --network gpu-private \
  --fixed-ip subnet=gpu-private-subnet,ip-address=10.10.10.32 \
  slurm-cpu2-port
Then create the servers with ports:
openstack server create \
  --image ubuntu-24.04 \
  --flavor m1.medium \
  --port slurm-controller-port \
  --key-name id_ed25519_kolla \
  slurm-controller

openstack server create \
  --image ubuntu-24.04 \
  --flavor m1.medium \
  --port slurm-cpu1-port \
  --key-name id_ed25519_kolla \
  slurm-cpu1

openstack server create \
  --image ubuntu-24.04 \
  --flavor m1.medium \
  --port slurm-cpu2-port \
  --key-name id_ed25519_kolla \
  slurm-cpu2
You may need to adjust these names if your actual network/subnet/security-group names differ. Confirm with:
openstack network list
openstack subnet list
openstack security group list
openstack keypair list
openstack flavor list
openstack image list
Required security group rules
The Slurm nodes need to talk to each other on the tenant network.
Allow at least:
SSH                 TCP 22
Munge/Slurm comms   internal node-to-node allowed
slurmctld           TCP 6817
slurmd              TCP 6818
slurmdbd            TCP 6819
ICMP                ping/debugging
Example:
openstack security group rule create \
  --proto tcp \
  --dst-port 22 \
  gpu-secgroup

openstack security group rule create \
  --proto tcp \
  --dst-port 6817:6819 \
  gpu-secgroup

openstack security group rule create \
  --proto icmp \
  gpu-secgroup
If the security group already allows all traffic between members of the same security group, you may not need extra internal rules. But for learning, make the Slurm ports explicit.
Corrected slurm.conf
On slurm-controller, use the real tenant hostnames/IPs.
Example:
ClusterName=openstack-slurm-lab
SlurmctldHost=slurm-controller

SlurmUser=slurm
AuthType=auth/munge
CryptoType=crypto/munge

StateSaveLocation=/var/spool/slurmctld
SlurmdSpoolDir=/var/spool/slurmd

SwitchType=switch/none
MpiDefault=none
ProctrackType=proctrack/cgroup
TaskPlugin=task/affinity,task/cgroup

SchedulerType=sched/backfill
SelectType=select/cons_tres
SelectTypeParameters=CR_Core_Memory

AccountingStorageType=accounting_storage/slurmdbd
AccountingStorageHost=slurm-controller
JobAcctGatherType=jobacct_gather/linux

GresTypes=gpu

SlurmctldPort=6817
SlurmdPort=6818

SlurmctldLogFile=/var/log/slurm/slurmctld.log
SlurmdLogFile=/var/log/slurm/slurmd.log

NodeName=slurm-cpu1 CPUs=2 RealMemory=3900 State=UNKNOWN
NodeName=slurm-cpu2 CPUs=2 RealMemory=3900 State=UNKNOWN
NodeName=gpu-test-01 CPUs=4 RealMemory=7900 Gres=gpu:gtx970:1 State=UNKNOWN

PartitionName=cpu Nodes=slurm-cpu1,slurm-cpu2 Default=YES MaxTime=INFINITE State=UP
PartitionName=gpu Nodes=gpu-test-01 MaxTime=INFINITE State=UP
Adjust CPUs and RealMemory after checking each VM:
lscpu
free -m
Do not overstate memory in slurm.conf; Slurm can mark nodes invalid or drained if configured resources do not match reality.
GPU node gres.conf
On gpu-test-01:
sudo tee /etc/slurm/gres.conf > /dev/null <<'EOF'
Name=gpu Type=gtx970 File=/dev/nvidia0
EOF
Verify the GPU inside gpu-test-01:
lspci | grep -i nvidia
nvidia-smi
ls -l /dev/nvidia*
Expected:
NVIDIA GTX 970 visible
/dev/nvidia0 exists
nvidia-smi works
Then Slurm can schedule it as:
#SBATCH --partition=gpu
#SBATCH --gres=gpu:1
Installation order
Use this order.
Step 1 — Keep OpenStack infrastructure untouched
Do not install Slurm on:
pve0
pve1
pve2
ctrl
cmp
gpu
Those are infrastructure hosts.
Step 2 — Use existing GPU VM
Keep:
gpu-test-01 10.10.10.36Validate again:
sudo ip netns exec qdhcp-54829687-5a62-4d95-a7d0-42f3e30f7dbf \
  ssh -i /home/sont/.ssh/id_ed25519_kolla ubuntu@10.10.10.36

hostname
lspci | grep -i nvidia
nvidia-smi
Step 3 — Create Slurm controller and CPU nodes
Create:
slurm-controller 10.10.10.30
slurm-cpu1       10.10.10.31
slurm-cpu2       10.10.10.32
Step 4 — Configure /etc/hosts on all Slurm VMs
sudo tee -a /etc/hosts > /dev/null <<'EOF'
10.10.10.30 slurm-controller
10.10.10.31 slurm-cpu1
10.10.10.32 slurm-cpu2
10.10.10.36 gpu-test-01 slurm-gpu1
EOF
Step 5 — Install Munge everywhere
On all four Slurm VMs:
sudo apt update
sudo apt install -y munge slurm-wlm
On controller only:
sudo apt install -y mariadb-server slurmdbdStep 6 — Configure Munge
Generate on controller, copy to:
slurm-cpu1
slurm-cpu2
gpu-test-01
Step 7 — Configure MariaDB and slurmdbd
Only on:
slurm-controllerStep 8 — Configure slurm.conf
Same file on all Slurm nodes.
Step 9 — Configure gres.conf
Only on:
gpu-test-01Step 10 — Start services
On controller:
sudo systemctl enable --now munge
sudo systemctl enable --now slurmdbd
sudo systemctl enable --now slurmctld
On compute nodes:
sudo systemctl enable --now munge
sudo systemctl enable --now slurmd
Validation commands
Run these from slurm-controller.
Check cluster
sinfo
sinfo -Nel
sinfo -o "%20N %10T %10c %10m %20G"
Expected:
slurm-cpu1     idle      no GPU
slurm-cpu2     idle      no GPU
gpu-test-01    idle      gpu:gtx970:1
Check GPU node
scontrol show node gpu-test-01Look for:
Gres=gpu:gtx970:1
CfgTRES=cpu=...,mem=...,gres/gpu=1
Run CPU job
sbatch --partition=cpu cpu-job.sh
squeue
sacct
Run MPI job
sbatch --partition=cpu mpi-job.shRun array job
sbatch --partition=cpu array-job.shRun GPU job
sbatch --partition=gpu gpu-job.shGPU job script:
cat > gpu-job.sh <<'EOF'
#!/bin/bash
#SBATCH --job-name=gpu-test
#SBATCH --partition=gpu
#SBATCH --nodes=1
#SBATCH --gres=gpu:1
#SBATCH --time=00:05:00
#SBATCH --output=gpu-test-%j.out

echo "Running on $(hostname)"
echo "CUDA_VISIBLE_DEVICES=$CUDA_VISIBLE_DEVICES"
nvidia-smi
EOF
Submit:
sbatch gpu-job.shCheck:
cat gpu-test-<jobid>.out
sacct -j <jobid> --format=JobID,JobName,Partition,AllocTRES,State,ExitCode
What the setup now demonstrates
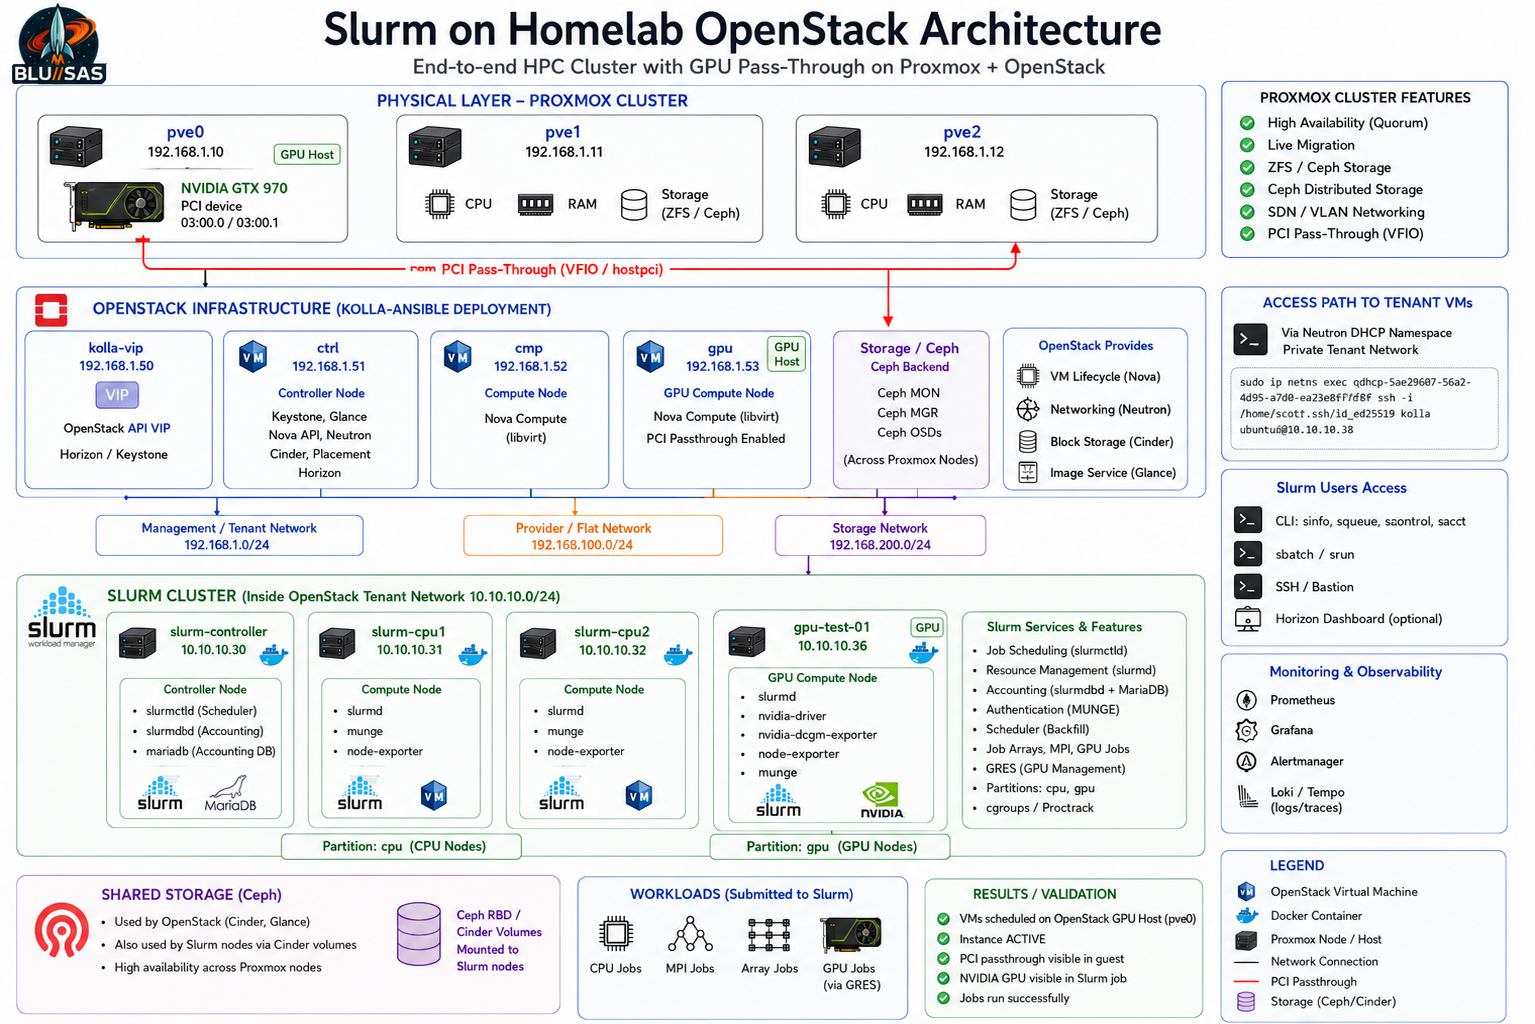
This design demonstrates a much more realistic stack than bare-metal Slurm:
Proxmox provides physical virtualization
OpenStack provides cloud-style VM lifecycle
Nova schedules GPU VM onto the GPU compute host
Libvirt/VFIO attaches GTX970 to the guest
Slurm treats the GPU VM as a GPU compute node
GRES exposes the GPU to Slurm jobs
Users submit jobs through sbatch/srun
Accounting records job history through slurmdbd/MariaDB
That is the important learning loop.
Phase 5 revised: Terraform + OpenStack + Slurm
Once the manual setup works, automate this exact topology.
Terraform should create:
slurm-controller  10.10.10.30
slurm-cpu1        10.10.10.31
slurm-cpu2        10.10.10.32
For gpu-test-01, you have two choices:
Option A — Keep existing gpu-test-01
Best for now.
Terraform manages only:
slurm-controller
slurm-cpu1
slurm-cpu2
Ansible configures all four nodes, including the pre-existing GPU VM.
This is the safest next step.
Option B — Recreate GPU node with Terraform
Later, Terraform also creates:
slurm-gpu1 / gpu-test-01using the GPU flavor:
g1.gtx970with extra spec:
pci_passthrough:alias = nvidia-gpu:1This is better for full automation, but only after the static/manual version works.
Final recommended plan
Build now
slurm-controller  10.10.10.30
slurm-cpu1        10.10.10.31
slurm-cpu2        10.10.10.32
gpu-test-01       10.10.10.36
Keep infrastructure clean
pve0/pve1/pve2 = physical virtualization only
ctrl/cmp/gpu   = OpenStack/Kolla infrastructure only
Slurm          = tenant workload inside OpenStack
Learn in this order
1. Basic Slurm commands: sinfo, squeue, scontrol
2. CPU jobs
3. Slurm accounting: slurmdbd, MariaDB, sacct
4. MPI jobs
5. Array jobs
6. GPU/GRES jobs on gpu-test-01
7. Terraform-created Slurm CPU nodes
8. Ansible-configured Slurm
9. Terraform-created GPU Slurm node
10. Elastic/bursting Slurm workers
This gives you a clean, technically correct homelab that maps directly onto real AI/HPC cloud infrastructure: OpenStack provisions capacity, Slurm schedules workloads, and GPU passthrough exposes accelerator resources to jobs.