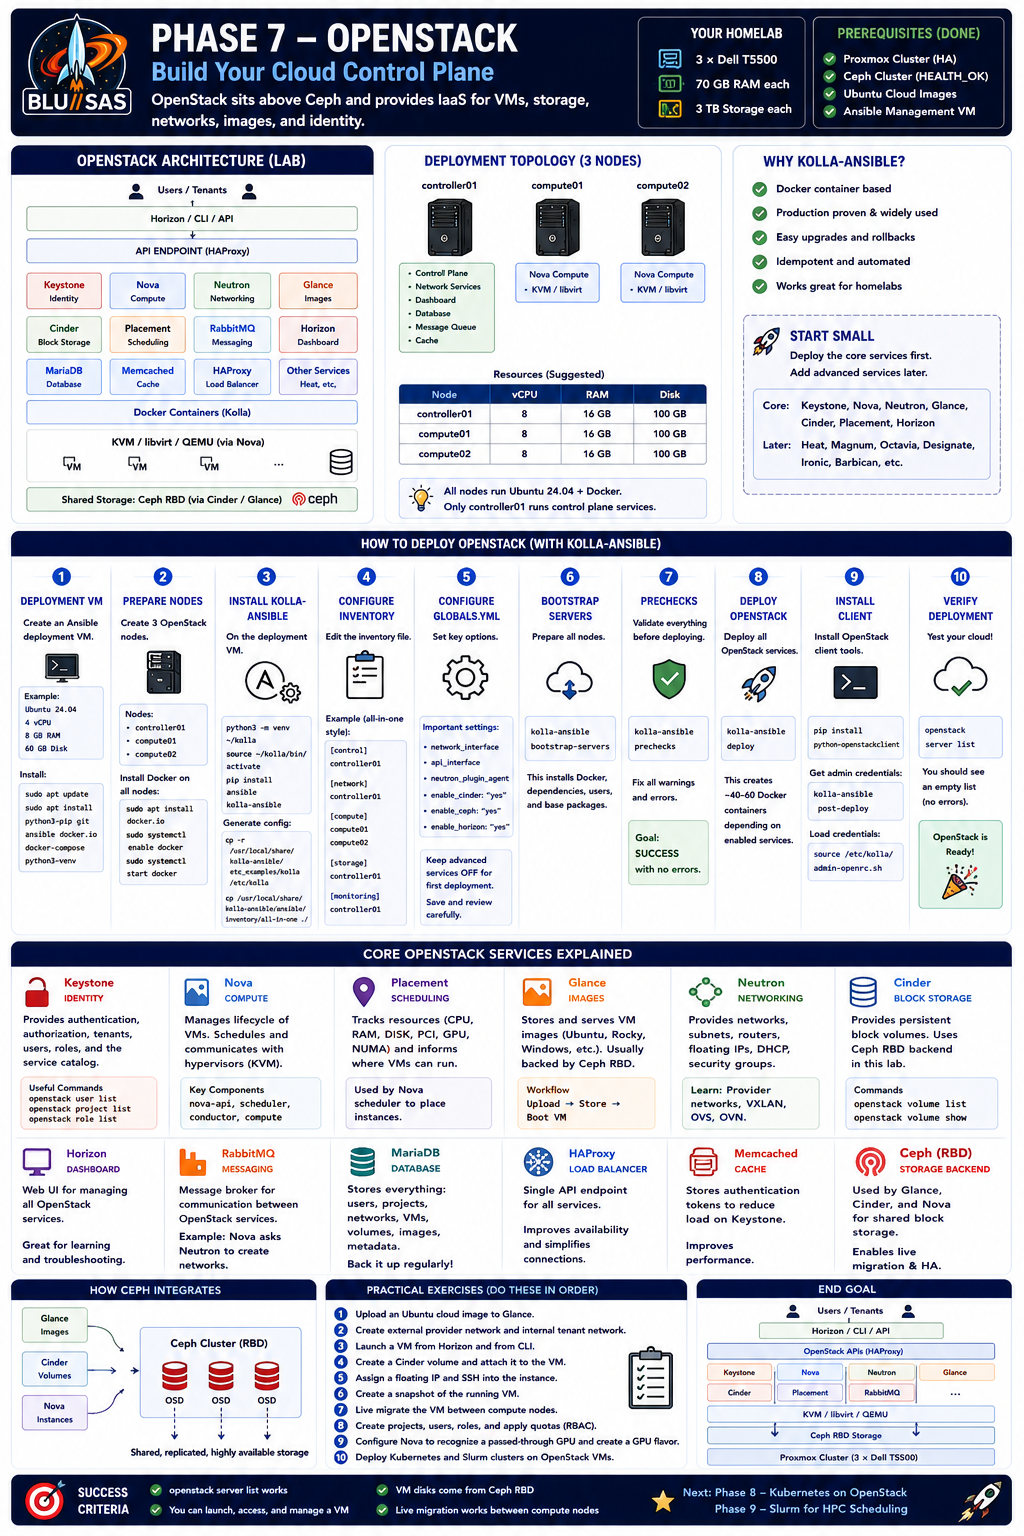
At this point your lab should look like this:
                3 × Dell T5500
                      │
          ┌───────────┴───────────┐
          │                       │
       Proxmox Cluster (HA)
          │
          ├── Ceph Cluster (HEALTH_OK)
          │
          ├── Ubuntu Cloud Images
          │
          └── Ansible Management VM
Ceph is now your shared storage layer.
OpenStack becomes the cloud control plane that sits above Ceph.
Overall Architecture
For your lab I recommend Kolla-Ansible.
Why?
- Uses Docker containers
- Easier to upgrade
- Mirrors many production deployments
- Very well documented
- Easier to rebuild if something breaks
Architecture:
                    OpenStack
─────────────────────────────────────────

Keystone      Identity

Nova          Compute

Neutron       Networking

Glance        Images

Cinder        Block Storage

Placement     Scheduling

Horizon       Dashboard

RabbitMQ      Messaging

MariaDB       Database

HAProxy       Load Balancer

Memcached     Cache

Docker        Containers

Ansible       Deployment
Step 1 — Build a Deployment VM
Don’t install OpenStack directly from Proxmox.
Instead create one VM.
Example:
Name:
ansible-openstack

Ubuntu 24.04

4 vCPU

8GB RAM

60GB Disk
Install:
sudo apt update

sudo apt install \
python3-pip \
git \
ansible \
docker.io \
docker-compose \
python3-venv
Step 2 — Prepare the OpenStack Nodes
Create three VMs.
Example
controller01

compute01

compute02
Suggested sizes
Controller
8 CPU

16GB RAM

100GB Disk
Compute 1
8 CPU

16GB RAM

100GB Disk
Compute 2
8 CPU

16GB RAM

100GB Disk
Later these can become real bare-metal servers.
Step 3 — Install Docker
On every OpenStack node:
apt install docker.ioEnable:
systemctl enable docker

systemctl start docker
Step 4 — Install Kolla-Ansible
On deployment VM
python3 -m venv ~/kolla

source ~/kolla/bin/activate

pip install \
ansible \
kolla-ansible
Generate configuration
cp -r \
/usr/local/share/kolla-ansible/etc_examples/kolla \
/etc/

cp \
/usr/local/share/kolla-ansible/ansible/inventory/all-in-one \
.
Step 5 — Configure Inventory
Example
controller01

compute01

compute02
Inventory
control

network

compute

storage

monitoring
Because this is only three nodes:
controller01

does

Control

Network

Monitoring
while
compute01

compute02

run Nova Compute
Step 6 — Configure globals.yml
This file controls everything.
Important settings
network_interface

api_interface

neutron_plugin_agent

enable_cinder

enable_ceph

enable_horizon

enable_heat

enable_magnum
For your first install
Enable only
Keystone

Nova

Neutron

Glance

Cinder

Placement

Horizon
Leave
Magnum

Heat

Octavia

Designate

Ironic

OFF
for now.
Step 7 — Bootstrap Servers
kolla-ansible bootstrap-serversThis installs
Docker
Packages
Dependencies
Users
Step 8 — Prechecks
Run
kolla-ansible prechecksFix every warning.
Do not continue until
SUCCESSStep 9 — Deploy
Deploy
kolla-ansible deployThis creates
Around
40-60

Docker containers
depending on enabled services.
Step 10 — Install Client
pip install python-openstackclientGenerate credentials
kolla-ansible post-deployLoad
source /etc/kolla/admin-openrc.shNow
openstack server listshould work.
The Core OpenStack Services
Keystone
Identity service.
Equivalent to:
Active Directory

LDAP

Identity Provider
Responsibilities
- Users
- Passwords
- Projects
- Roles
- Authentication
- Service Catalog
Typical commands
openstack user list

openstack project list

openstack role list
Nova
Controls virtual machines.
Nova does not actually run VMs.
It asks:
libvirt

KVM

QEMU
to run them.
Nova contains
nova-api

nova-conductor

nova-scheduler

nova-compute
Learn
Scheduler

Cells v2

Placement
especially.
Placement
One of the most important services.
Tracks
CPU

RAM

Disk

PCI

GPU

NUMA
Scheduler asks Placement
Where should this VM go?Without Placement
Nova cannot schedule properly.
Glance
Stores images.
Example
Ubuntu

Rocky

Windows
Typically backed by
Ceph RBDWorkflow
Upload Image

↓

Store in Ceph

↓

Nova Boots VM

↓

Copies metadata

↓

Creates VM disk
Commands
openstack image listNeutron
Probably the hardest service.
Provides
Networks

Routers

DHCP

Floating IPs

Security Groups
Learn
Provider Networks

Tenant Networks

VXLAN

Open vSwitch

OVN
Spend time understanding packet flow.
Cinder
Block Storage
Instead of storing VM disks locally
Nova

↓

asks

↓

Cinder

↓

which creates

↓

Ceph RBD Volume
Commands
openstack volume listHorizon
Web interface
Useful while learning.
Eventually
You’ll mostly use
CLI
Terraform
Ansible
RabbitMQ
OpenStack services communicate using queues.
Example
Nova
asks
Neutron
to create networking.
RabbitMQ transports those messages.
MariaDB
Stores
Everything.
Users
Projects
Networks
VM metadata
Volumes
Images
Never delete this database.
HAProxy
Front-end load balancer.
Provides
One API endpoint
instead of
20 different service addresses.
Memcached
Stores authentication tokens.
Reduces load on Keystone.
How Ceph Fits
Once OpenStack is running, integrate Ceph:
Glance
    ↓
Ceph RBD

Cinder
    ↓
Ceph RBD

Nova
    ↓
Ceph RBD
This allows:
- Boot from volume
- Thin provisioning
- Snapshots
- Live migration without copying disks
- Shared storage for all compute nodes
Practical Exercises
Work through these in order:
- Upload an Ubuntu cloud image to Glance.
- Create an external provider network and an internal tenant network.
- Launch your first VM from Horizon and again using the CLI.
- Create a Cinder volume and attach it to the VM.
- Assign a floating IP and SSH into the instance.
- Create a snapshot of the running VM.
- Migrate the VM between compute nodes (shared Ceph storage means no disk copy).
- Create separate projects and users, applying quotas and RBAC.
- Configure Nova to recognise a passed-through GPU and create a GPU-enabled flavor.
- Deploy a small Kubernetes cluster on OpenStack VMs, then later a Slurm cluster on the same cloud.
End Goal
By the end of Phase 7, your homelab should resemble this:
             Users
                │
          Horizon / CLI / API
                │
           OpenStack APIs
                │
 ┌────────────────────────────────────┐
 │ Keystone  Nova  Neutron  Glance    │
 │ Cinder    Placement  RabbitMQ      │
 └────────────────────────────────────┘
                │
         KVM / libvirt / QEMU
                │
        Shared Ceph RBD Storage
                │
      Proxmox Virtual Machines
                │
      Three Dell T5500 Workstations
Once this foundation is stable, you’ll be ready to build Phase 8 (Kubernetes on OpenStack), followed by Phase 9 (Slurm for HPC scheduling), creating a complete AI/HPC cloud platform.